What is a bar chord?
Is the correct term bar chord or barre chord?
Why are bar chords so hard to play?
8 general tips to help you learn bar chords
1. Get your mindset right
2. Adopt the Half-Bar to Full-Bar method
3. Add to every practice routine
4. Adopt Bar Chord Month
5. Get the pressure of the bar right
6. Learn to self-diagnose
- identify which string is buzzing/muffling - is it a barred string or fretted string?
- try to fix it by adjusting your fretting fingers.
- try to fix the bar - either moving/rolling the bar finger or giving it slightly less pressure could do the trick
7. Keep the index finger straight
8. Remember your why
Bar Chords - how to get unstuck
1. Use a capo
2. Start higher up the neck
3. Lower your guitar's action
4. Reduce your string gauge
5. Practice just the bar
6. Master the half-bar
7. Follow the exercises
8. Learn the other bar chord shapes
- Once you know the E chord, it is relatively easy to bar the Em chord.
- The Am chord is the best next chord to bar (as you are moving the E chord ‘down’ a string).
- The A chord is regarded as the most tricky - but worth learning as it is extremely useful.
9. Follow this quick video lesson
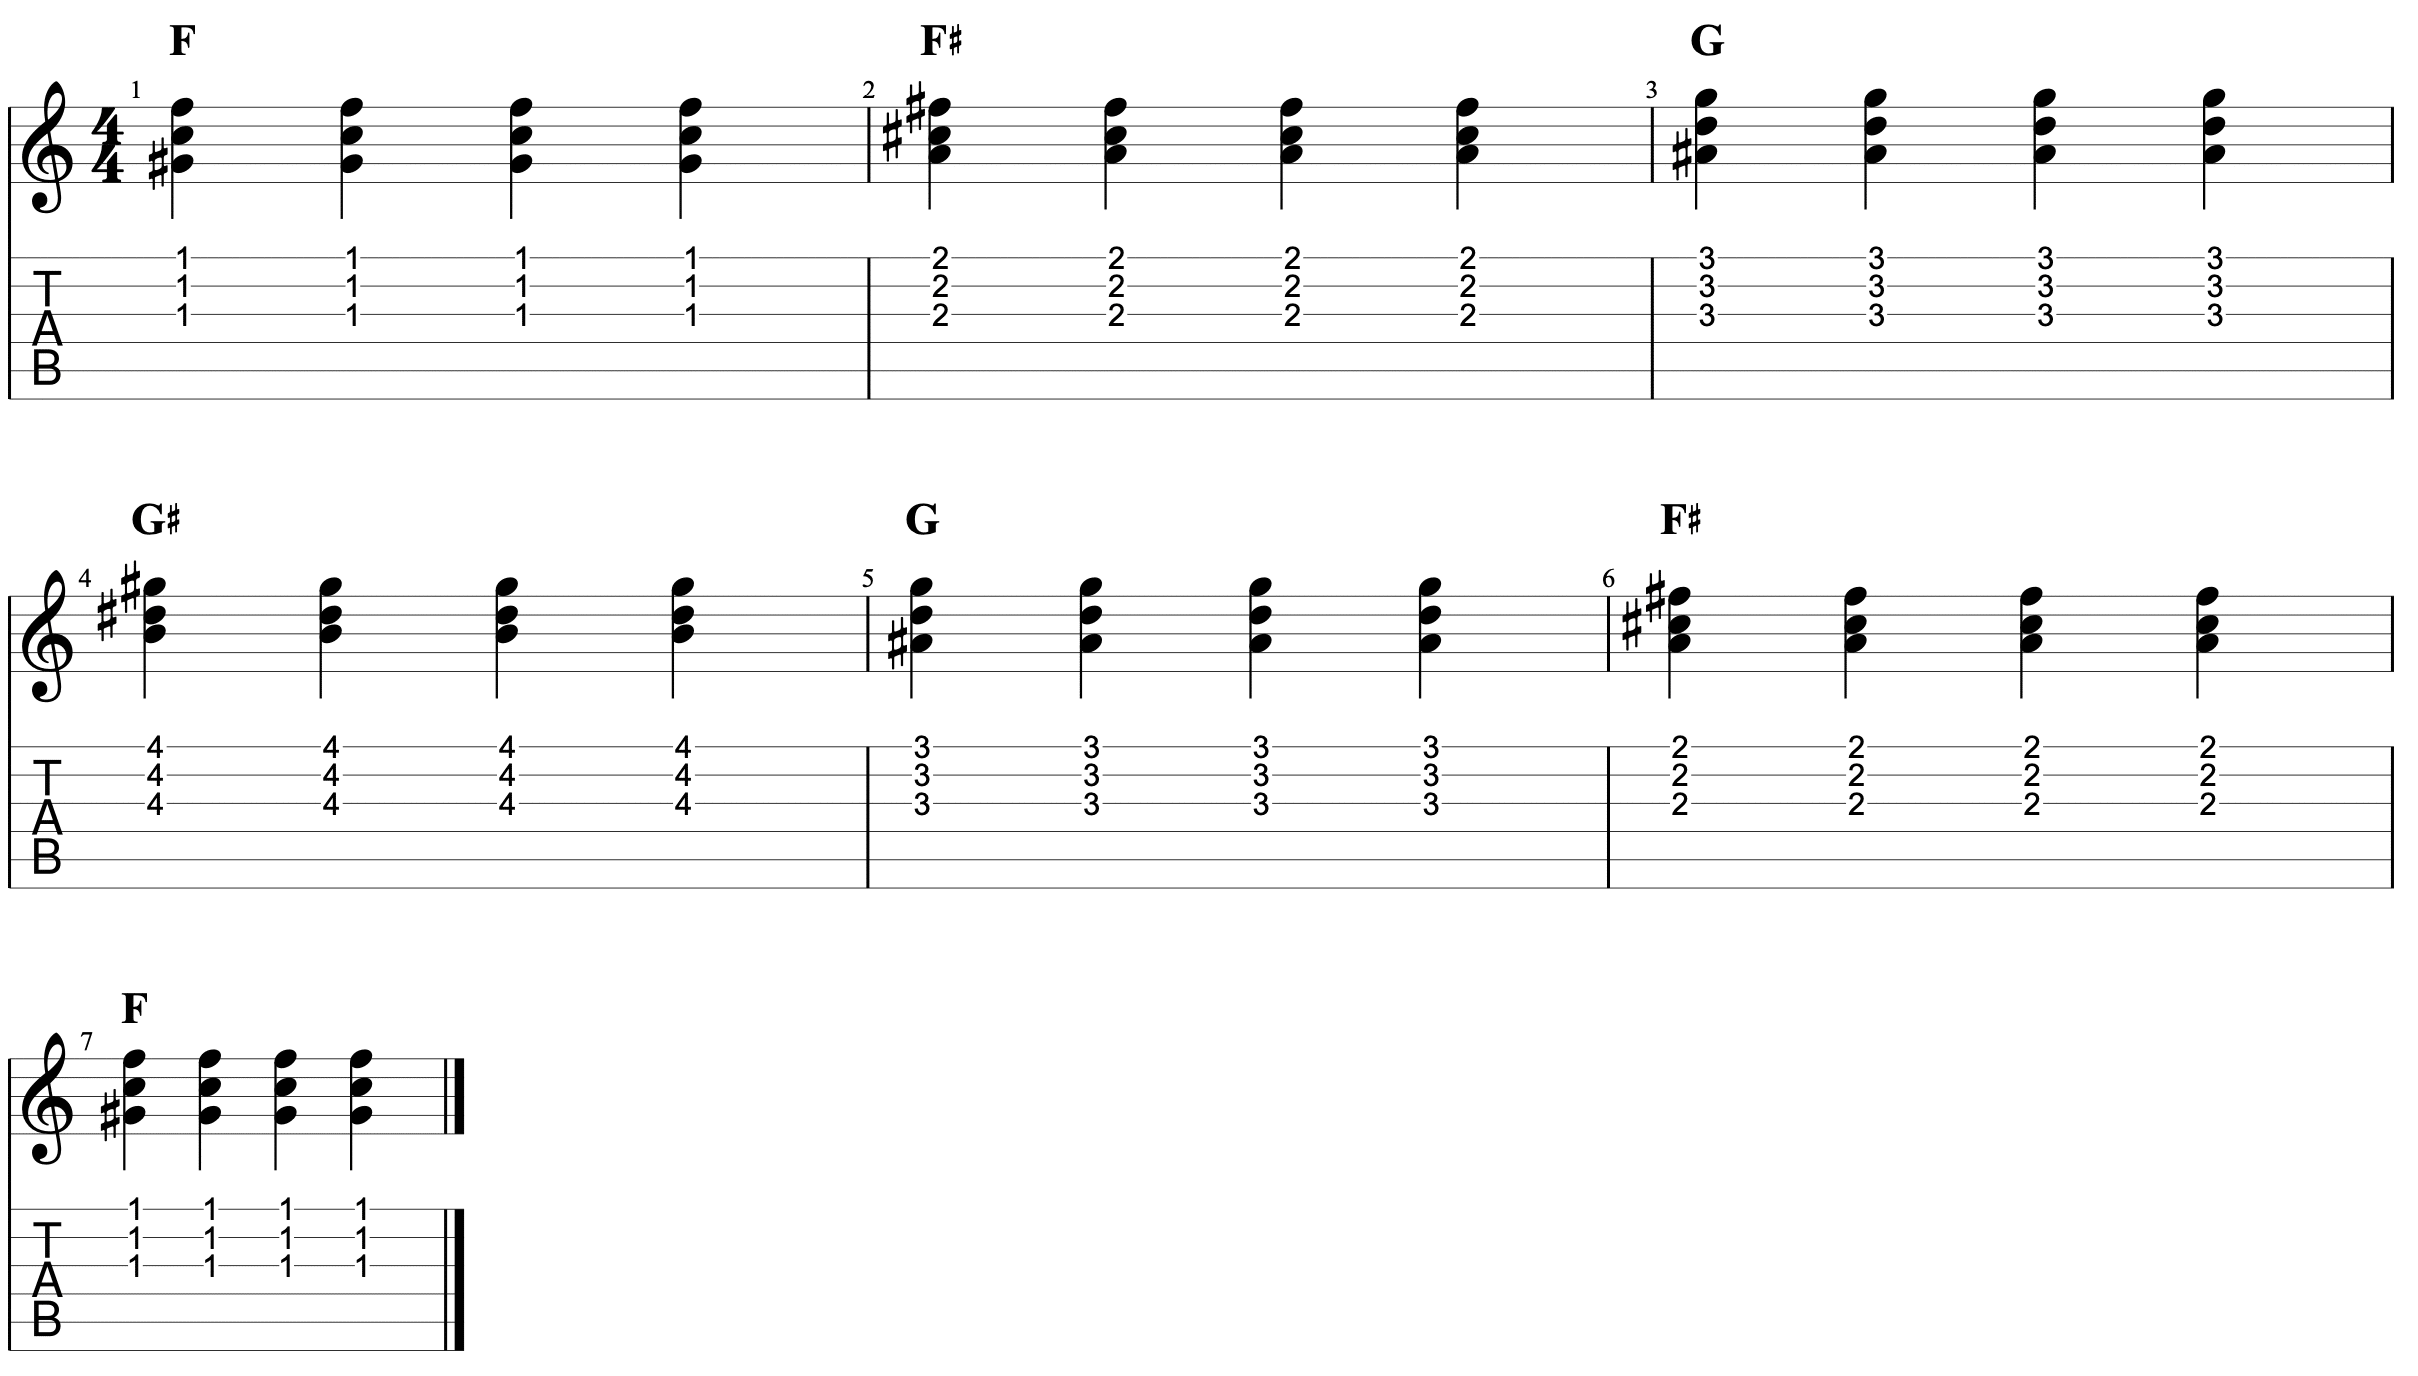
How to bar the F chord
Exercise 2 - The Two Finger Bar Chord Arpeggio
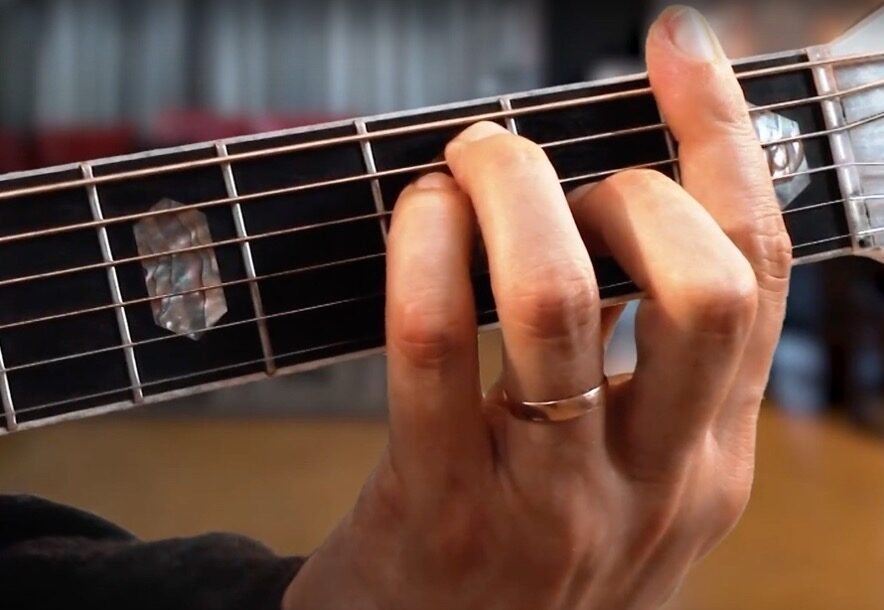
Exercise 3 - The Three Finger Bar Chord
Exercise 4 - The Three Finger Bar Chord Arpeggio
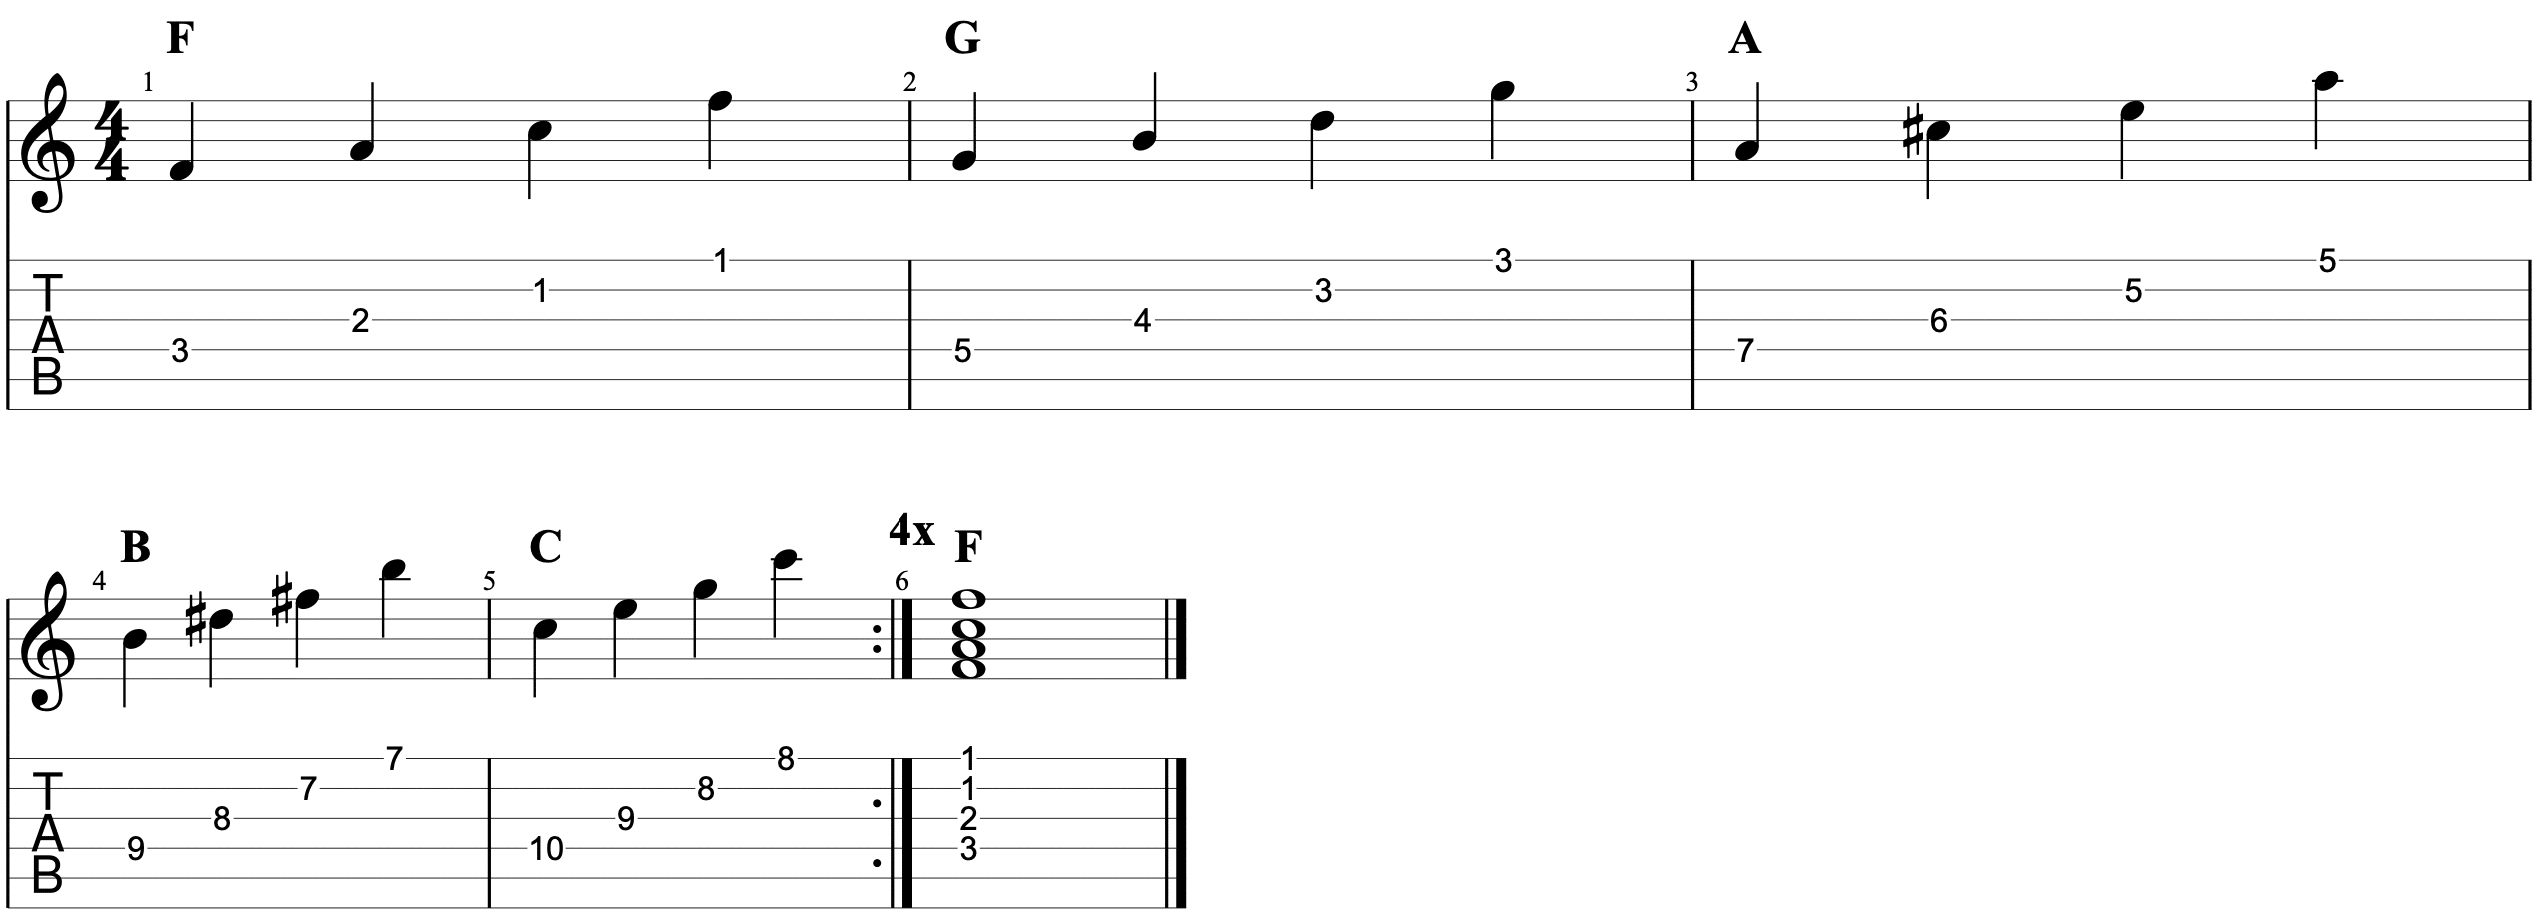
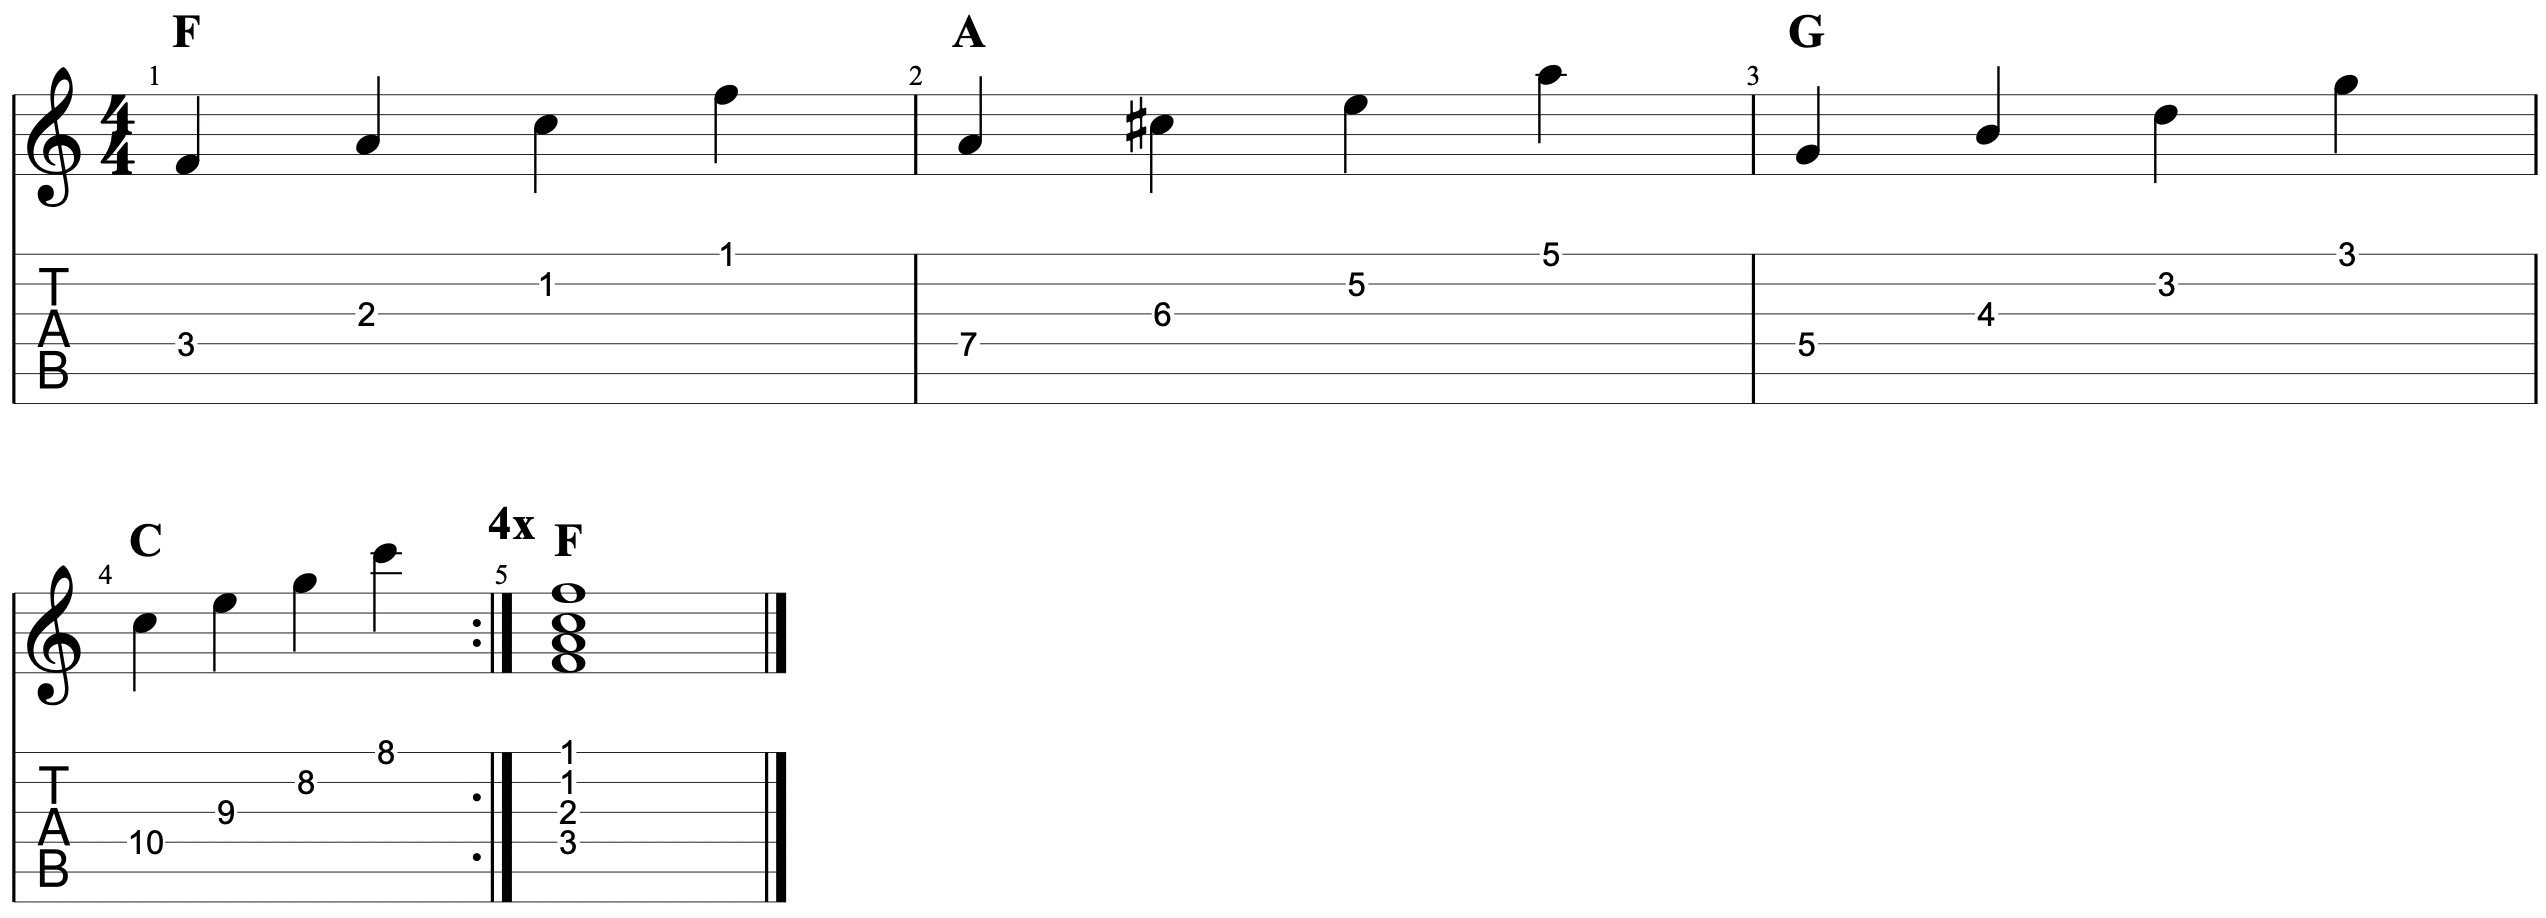
Exercise 6 - 3 Finger Bar Chord Progression
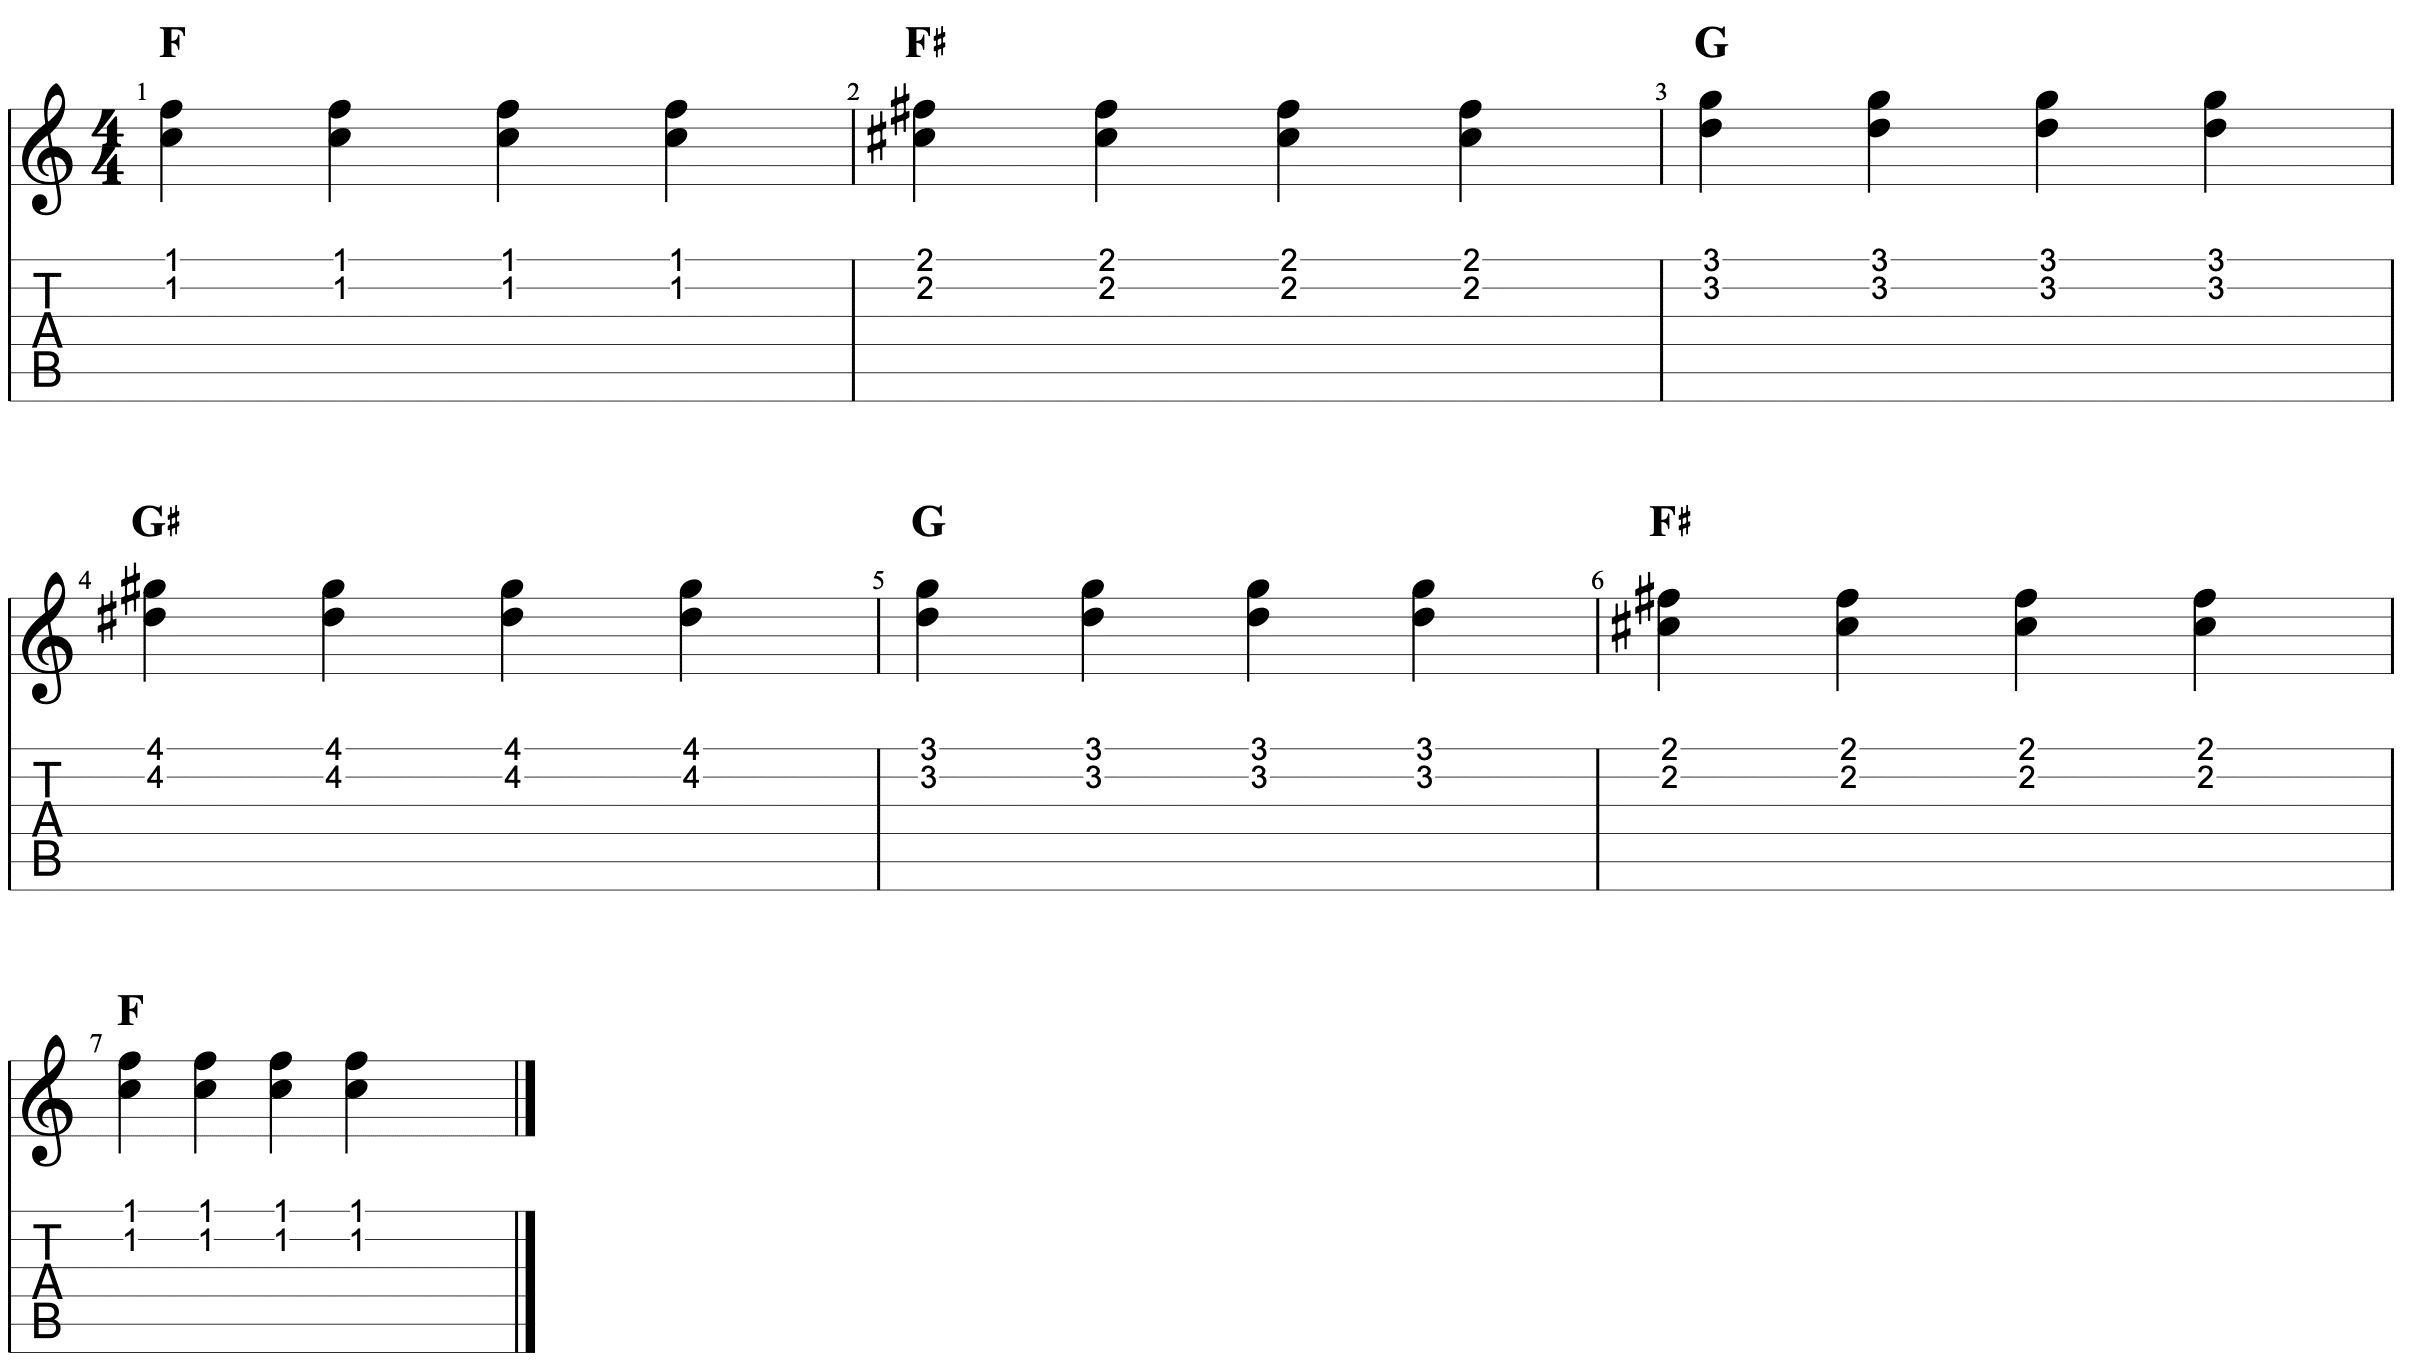
Exercise 7 - 3 Finger Bar Chord Arpeggio
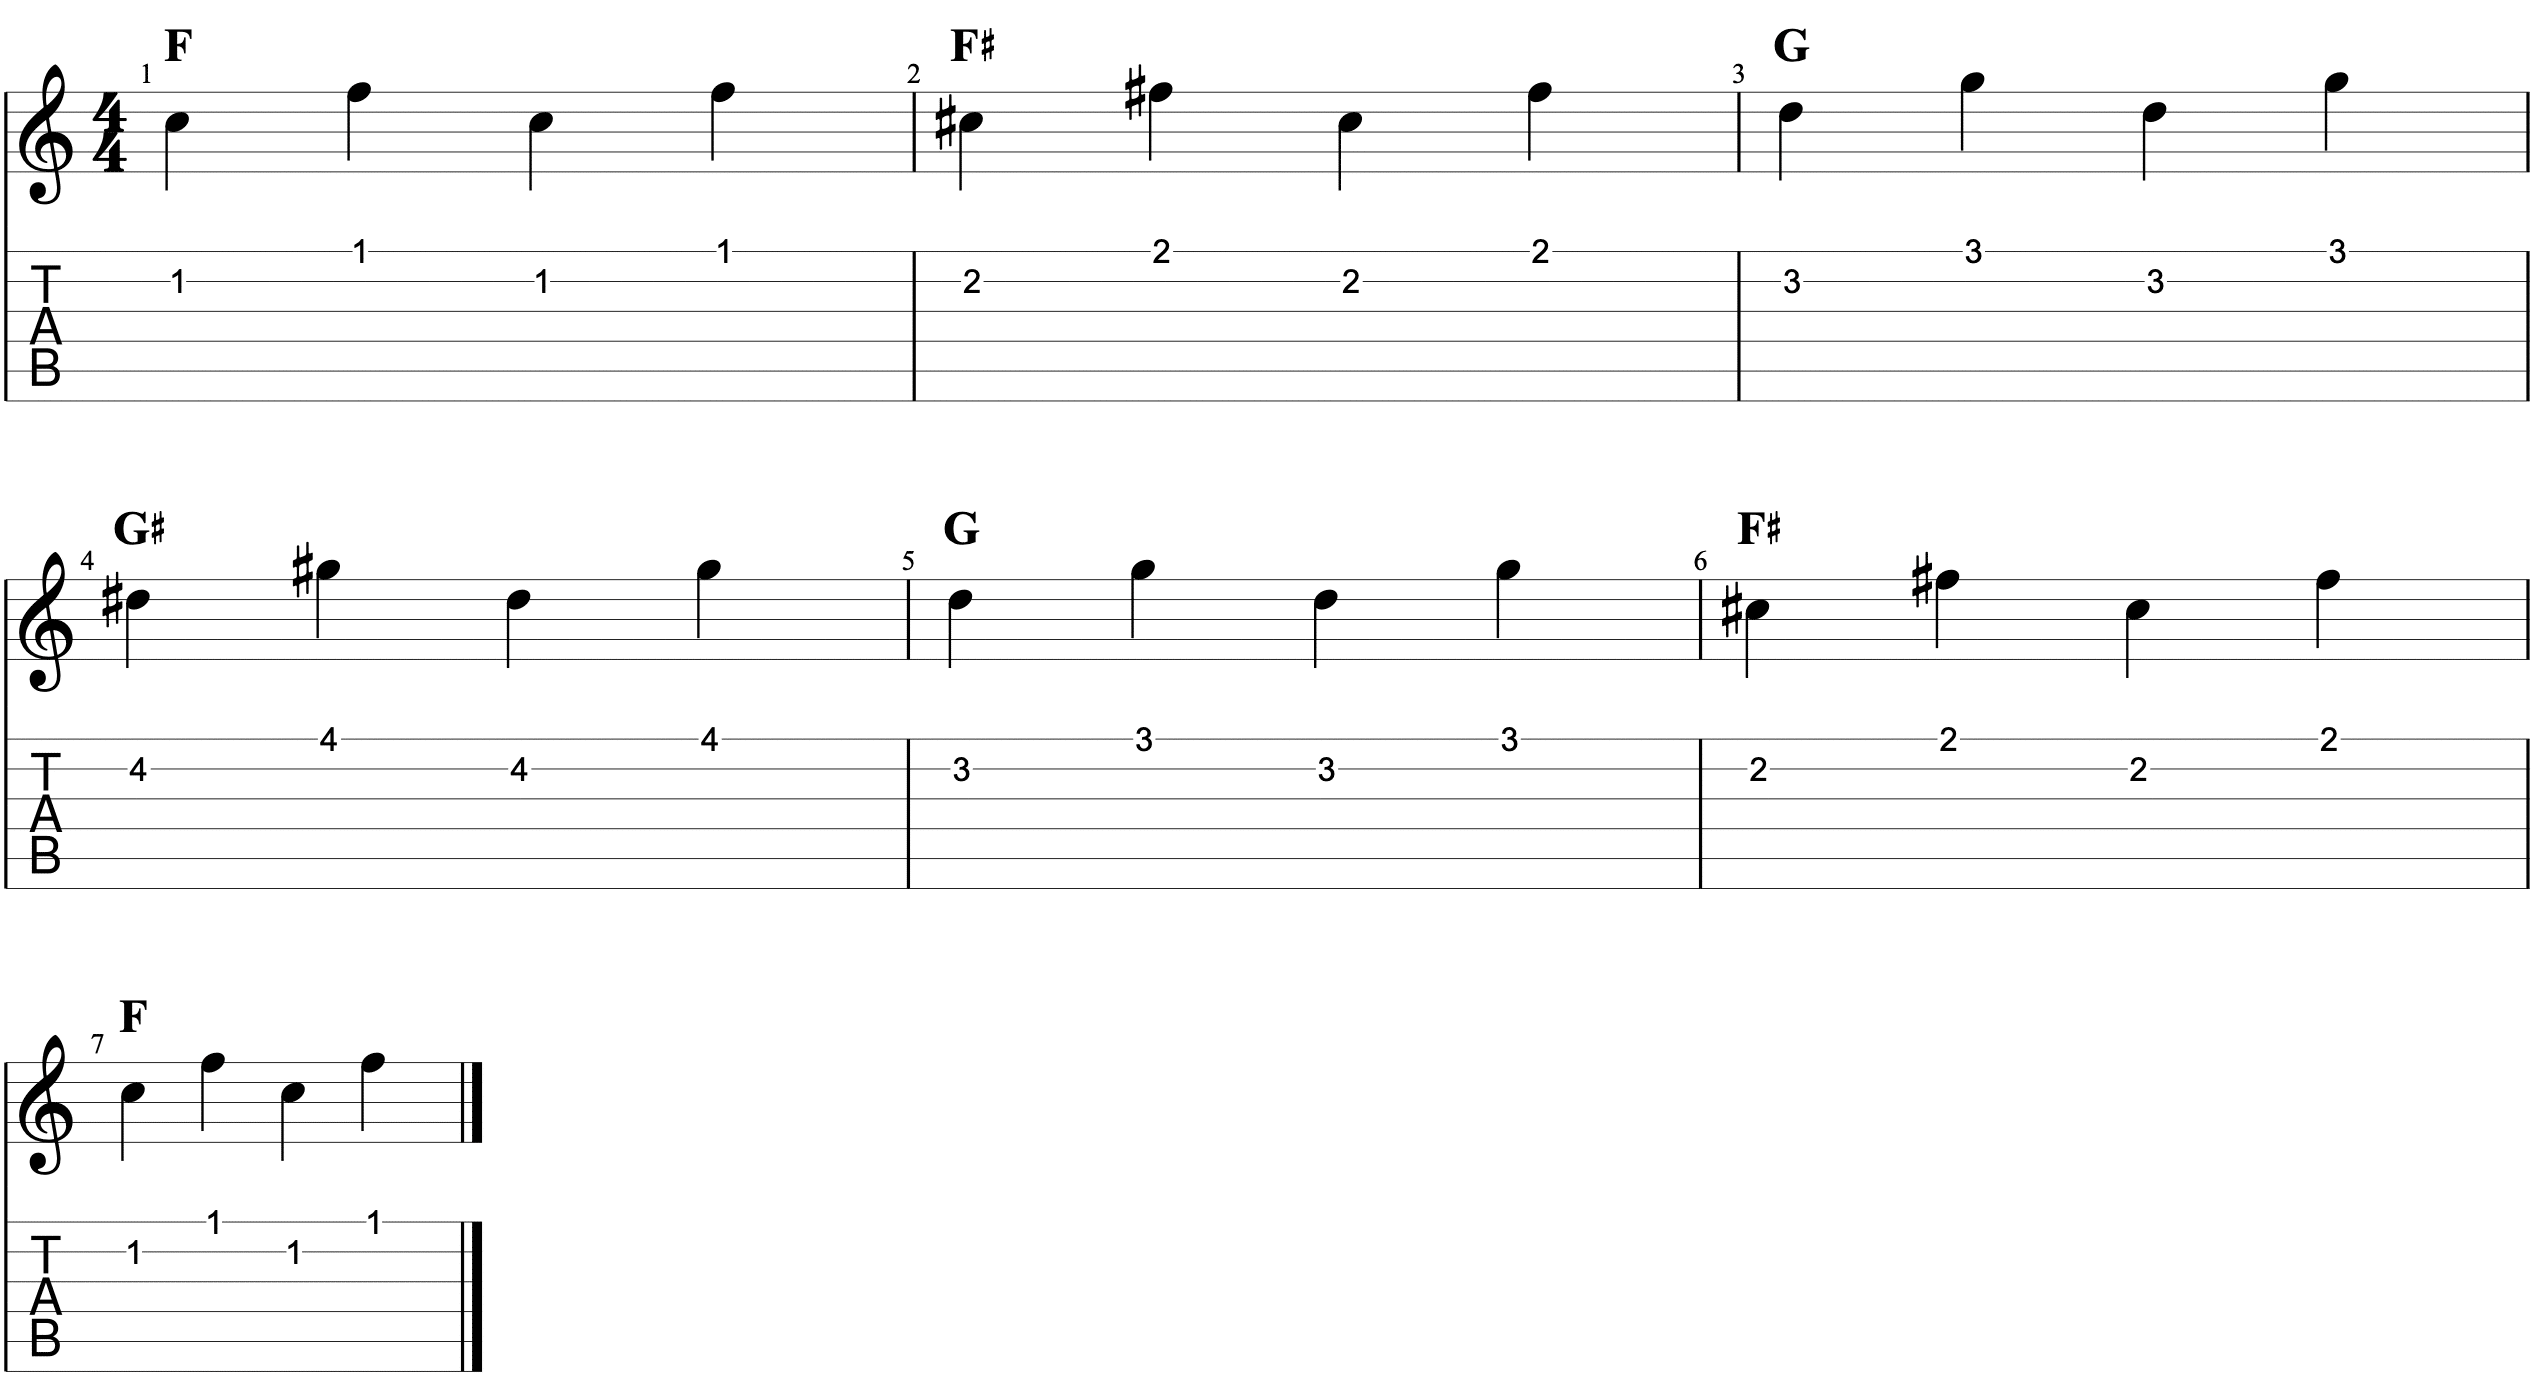
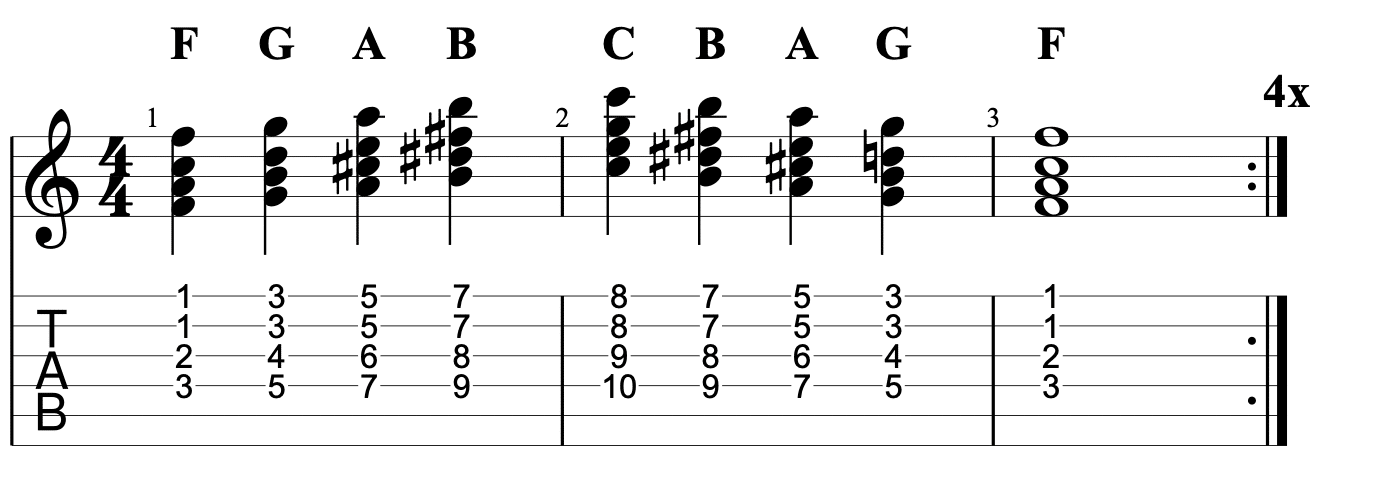
Exercise 8 - 4 Finger Bar Chords
Exercise 9 - 4 Finger Bar Chord Arpeggio
Exercise 10 - 4 Finger Bar Chord Arpeggio
summary
Good Luck!
INTERMEDIATE LESSON
The ultimate guide to bar chords
Frustrated because your bar chords don't sound great? This guide is for you!
A bar chord is a chord where the index fingers forms a rigid "bar" across the strings in order to fret multiple strings.
There is a reason for this. We have 6 strings but 4 fingers. That's not enough. In order to fret all strings, sometimes a finger has to fret multiple. This is usually the index finger and learning to play bar chords requires a little bit of dedication. But fear not - this guide will get you there!
The term barre comes from the method of using the index finger to form a rigid "bar" across the strings. The original spelling "barré" is French, translating to "barred". Most textbooks an online guides will refer to it as a "barre chord".
However, despite speaking fluent French and living in France for years - I can't see a reason to translate the word bar into French when playing guitar so I refer to them as bar chords.
Do you want to know how most beginners try to learn bar chords?
They look at the place every finger should be (including the bar) and try to fret it all in one go. After a few seconds, maybe they can get the bar chord in place. A few notes sound off but some adjustment fixes that. Now they change chords. When they go back to the bar chord - well, that's going to take a few seconds of prep time - and still doesn't sound crisp!
Is there a better way? You bet there is. The secret is to break this complex action into steps and master each one - one at a time.
Then you'll be playing crisp bar chords that you can fret instantly where every note rings beautifully. Let me show you how.
The first times you play a bar chord, you might think “oh no, this is impossible”. Well, it isn’t. Like anything else that is complex, you need to break it down.
Here are some general tips to get started.
Do you think to yourself “oh dear, I’ll never be able to play a bar chord where the chord sound clear and crisp”. It’s better to adopt a mental position of certainty. Of course, you’ll be able to play a perfect bar chord. Whatever you tell your brain, it will believe!
Remember learning your first chords - the open chords like D, G and C? Those early days were tough - you may also have wondered if you’d ever change those chords quickly. Now you probably can! It’s exactly the same thing. Put in the daily practice and you’ll have this in 1 month.
Playing bar chords requires finger strength, learning chords shapes, using your weakest fingers and good wrist position. Few people just go boom - and play a perfect bar chord. It will take a little time, but you’ll find all the steps and exercises in this guide.
The best way to learn bar chords is to break it down. Start with the half-bar exercises (below) and this will immediately give you something that isn’t too hard and is a step in the right direction. It will also enable you to play a partial version of the bar chord more or less right now.
Then once this is mastered, you move on to the full bar exercises. This is a tried and tested formula that builds up step-by-step. It will work for you.
Dedicate a little bit of every practice session to bar chords. Dedicate 4-5 minutes of every session to just playing bar chord exercises (once you are warmed up a bit). Pick a song that has a bar chord and decide to learn that song. Practice those changes every practice session until you have it.
If you practice regularly, you can get a decent bar chord within a month of practice. I see it all the time with students.
So think of this as being a “bar chord month”. You are going to really practice nailing this. And in 1 months time, you’re going to be able to do it.
I give you the exercises below. But before you read on, take a pause and say to yourself “this is bar chord month and in 30 days time, I’m going to be able to do it”
You don’t want to push down too hard with the index/bar finger. You need to press the strings firmly enough to make each string sound clearly, and you don’t want any more pressure than that. Always (during learning phase) try to press a bit less and see if all strings still sound clearly. If yes, then stick what that. You were pushing down too hard.
Pushing down too hard is genuinely a problem because it can cause injury or at least some discomfort if playing a long time. Rather, you want your wrist to be under no more pressure than is necessary. Also, if you are pushing down too hard, this make you less nimble. It’s not going to be as easy to get to that next chord.
Let’s say you just fretted a bar chord. Take your time until you feel like you have fretted the bar chord correctly. Now test it. Ring each string separately to see if you hear any buzzing or muffled strings and if so:
Once every string sounds good, stay here for a while - either continuing to pick each note and perhaps introducing a little pattern to make it musical? Or giving it a strum - and checking again a bit later that each string is still sounding clear.
When learning bar chords, sometimes the index finger (the one doing the bar) can skew diagonally. It should be straight. It’s also a good idea to keep it close to the fret (towards your head) rather than right in the centre of the fret. The finger should be parallel to that fret and can be close to it too.
Have you ever been given the chords to a song and you’re really enjoying it. All the open chords (D, G, Am, C) are there and you can play them. But then you encounter a B minor or an F# and now you’re stuck. You can’t play the rest of the song or keep up with the other musicians. How does that feel? Not very good. You want to be able to play any set of chords, whether a bar chord is required or not.
This is “your why”. When you are practicing bar chords and it’s a struggle and you feel like giving up, come back to this place. You know it’s possible within a month. You know you have a guide here that will work. All that is required is some time and discipline and then you can play any chord you ever need - even if it is has a bar in it.
Remind yourself why this is important. And practice on.
Scroll down this guide to see the step-by-step exercises that show you how to learn bar chords step by step.
First, here are some tips that you can use if you are finding it tough going.
The challenge of bar chords is hold down multiple strings with a single finger. If it is proving a challenge, one thing that can help is using a capo. The pressure required to press down strings is less if you use a capo. Try it now - using a capo at the 5th fret for example.
This is similar to using a capo, but slightly different. If you struggle to play a bar chord, try moving the same shape up the neck. Unlike open chords, all strings that you are playing are fretted. So you can just slide it up the neck.
Yes, this will be a different chord tonality, but it helps you to fret the shape at an easier place to begin with. Try different places along the fretboard and see if there is a certain place where playing bar chords just seems easiest and nicest.
A guitar’s action is the distance between the strings and the fretboard. You can think of this at how high up the strings are off the guitar. The higher the action, the more difficult it is to fret the strings and press them down.
High action makes bar chords in particular really difficult. You can take your guitar to a local guitar store and they can perform an adjustment that will make your guitar easier to play (in general). If your strings are high up off the fretboard, bar chords will be tough - but action can be easier lowered.
String gauge is a measure of how heavy and how thick your strings are.
Consider using a light gauge of strings to make playing bar chords more easy. If it is an acoustic guitar, then 11 or 12 gauge strings can be a good choice for a beginner (whereas an intermediate player might like 13 gauge acoustic strings).
Heavier strings can be a good thing. When strumming or playing, you can hit them harder if the strings have heavier gauge. For beginners, starting with a light gauge string is often a good choice.
One way of decomposing the bar chord is just to play the bar. This involves just barring some strings with the index finger. Once barred, you can move the bar up and down one fret at a time and self-diagnose to see if each string rings clearly.
One of the exercises below will show you how to isolate and practice just the bar.
A “full bar chord” is when the index finger plays a bar while fretting all six of the strings at the same time. You bar all the strings.
A “half bar chord” or “partial bar chord” is where the index finger plays a bar on some of the strings (2 strings or more but not them all).
The best method to learn bar chords is to firstly play some half bar chords and then get comfortable. This gives us a quicker way to be able to play that chord that you need for the chord sequence you want to play. If you want to play F, then the F chord with a half-bar is the easiest to learn. Now you can play F!
This also brings you some of the way to learning the full bar chord. Once you can do a half-bar chord, it’s only another step to the full-bar chord
In one of the following sections, I will provide you a set of exercises that you can follow to learn bar chords. This is a step-by-step approach that you can work through, mastering each exercise at a time.
This takes the mystery out of bar chords.
Learning how to bar with the E chord is a natural place to start.
Although this article is the "ultimate guide" to learning bar chords, I have previously explained some of these techniques in this video lesson.
Taking 5 minutes to watch this lesson will allow you to see for yourself how I use the non-index fingers and some easy chords (partial chords) to help you get started.
While not as comprehensive as this full lesson, it does show you a few things in action.
In this video, we learn how to break down some simple steps to playing the F chord - including how to play it with a bar chord.
Bar Only Exercises
Exercise 1 - The Two Finger Bar Chord
The first exercise requires barring just two strings - the two thinnest strings E and B. You can either pluck or strum these and after playing them four times, you move up a fret.
You can move up the fretboard as far as you like. In this exercise, we move up to the 4th fret and descend again.
You can play this just using the top part of the left hand (the bit of your finger behind your finger nail). Form a sort of 'pad' and press just these 2 strings down and get used to playing just these two strings and moving that shape up and down.x
The second exercise is basically the same as the first exercise - except you play it as an arpeggio, which means playing a chord one string at a time.
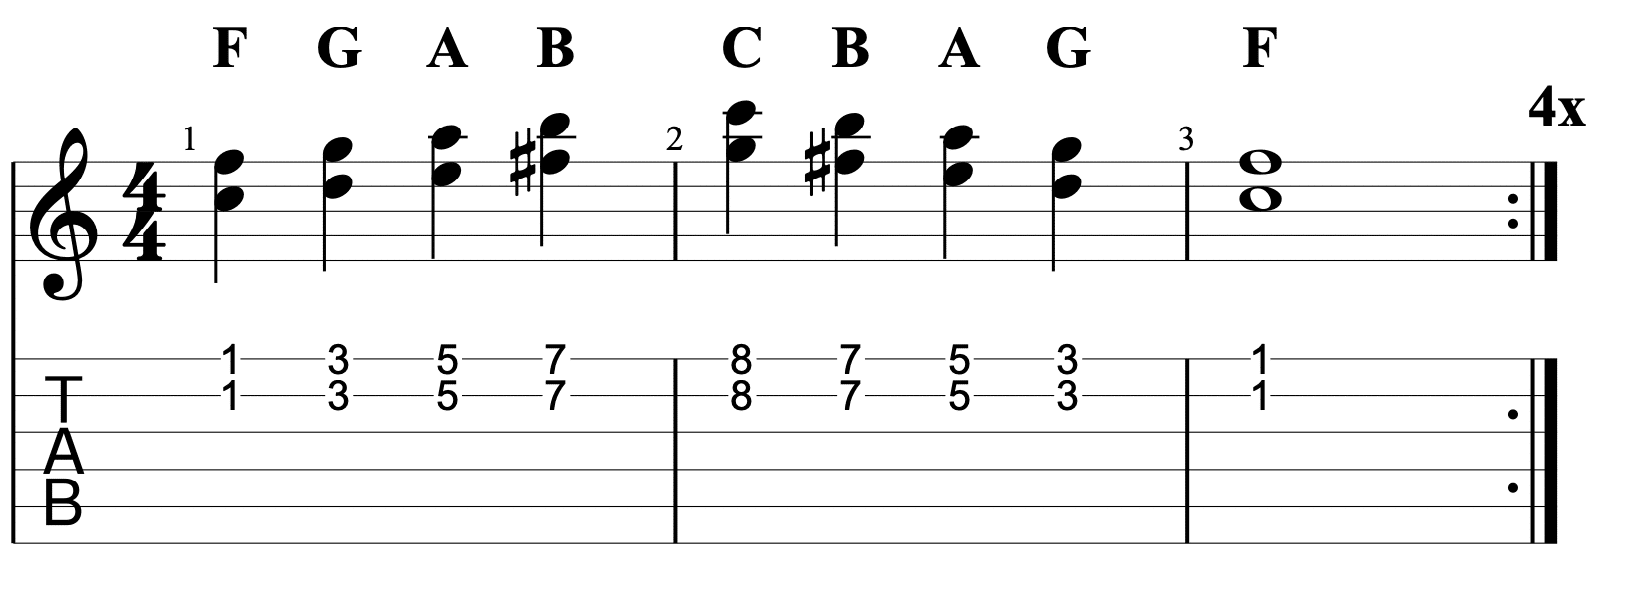
Now we use the index finger to hold down 3 strings - a 3 string half-bar or partial bar. This will require you to use a bit more of the index finger. Aim to use the part of the index finger from the knuckle down - using all of that to bar these strings.
This exercise is similar to the previous exercise - except you play it as an arpeggio, which means playing a chord one string at a time.
Half Bar Chord Exercises
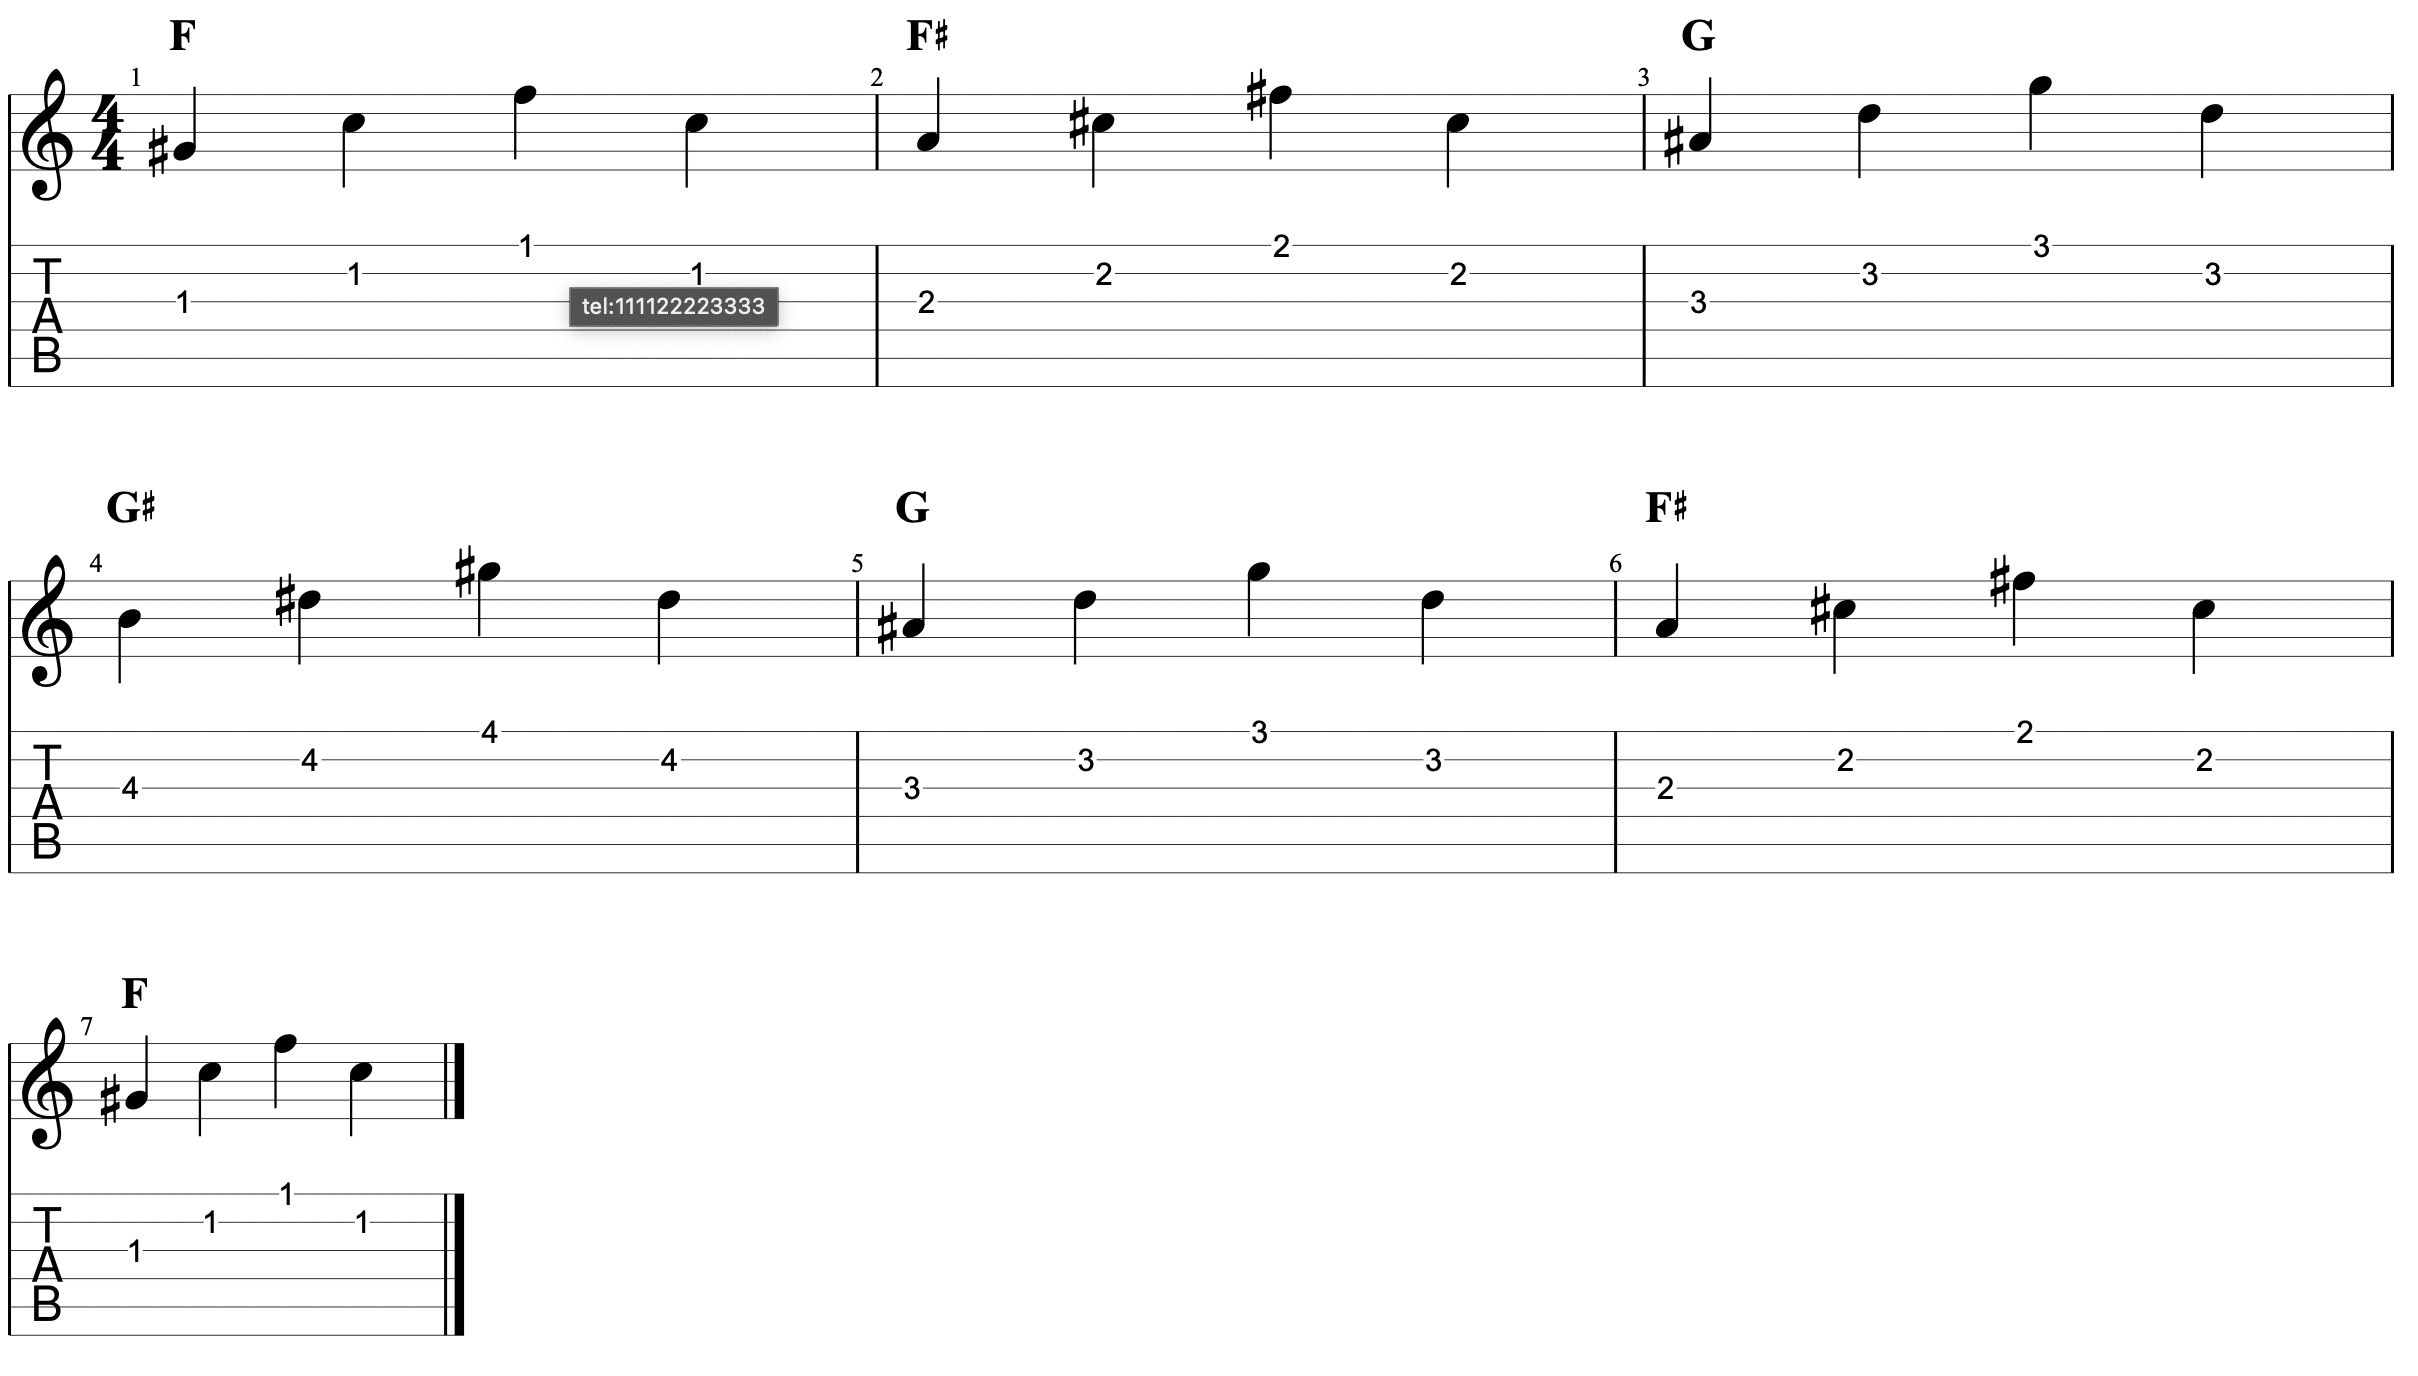
Exercise 5 - Half Bar Chord Progression
This is the 2-finger bar chord that we saw in a previous exercise. This time, however, we change what we fret on each beat so basically this progression is "moving quicker" than the previous one.
This exercise is similar to the previous exercise - except you now add a note.
This note should be played with the second finger (middle finger) of the left hand. I strongly encourage you to use the 2nd finger because later exercises will use other fingers - which need to be free!
This exercise is similar to the previous exercise - except you now play individual strings of the fretted chord (also known as an arpeggio)
This exercise is similar to exercise 6 - but we're adding another finger. This time, play the additional note with the 3rd finger (ring finger) of the fretting hand.
This exercise is similar to the previous one - but now with an arpeggio.
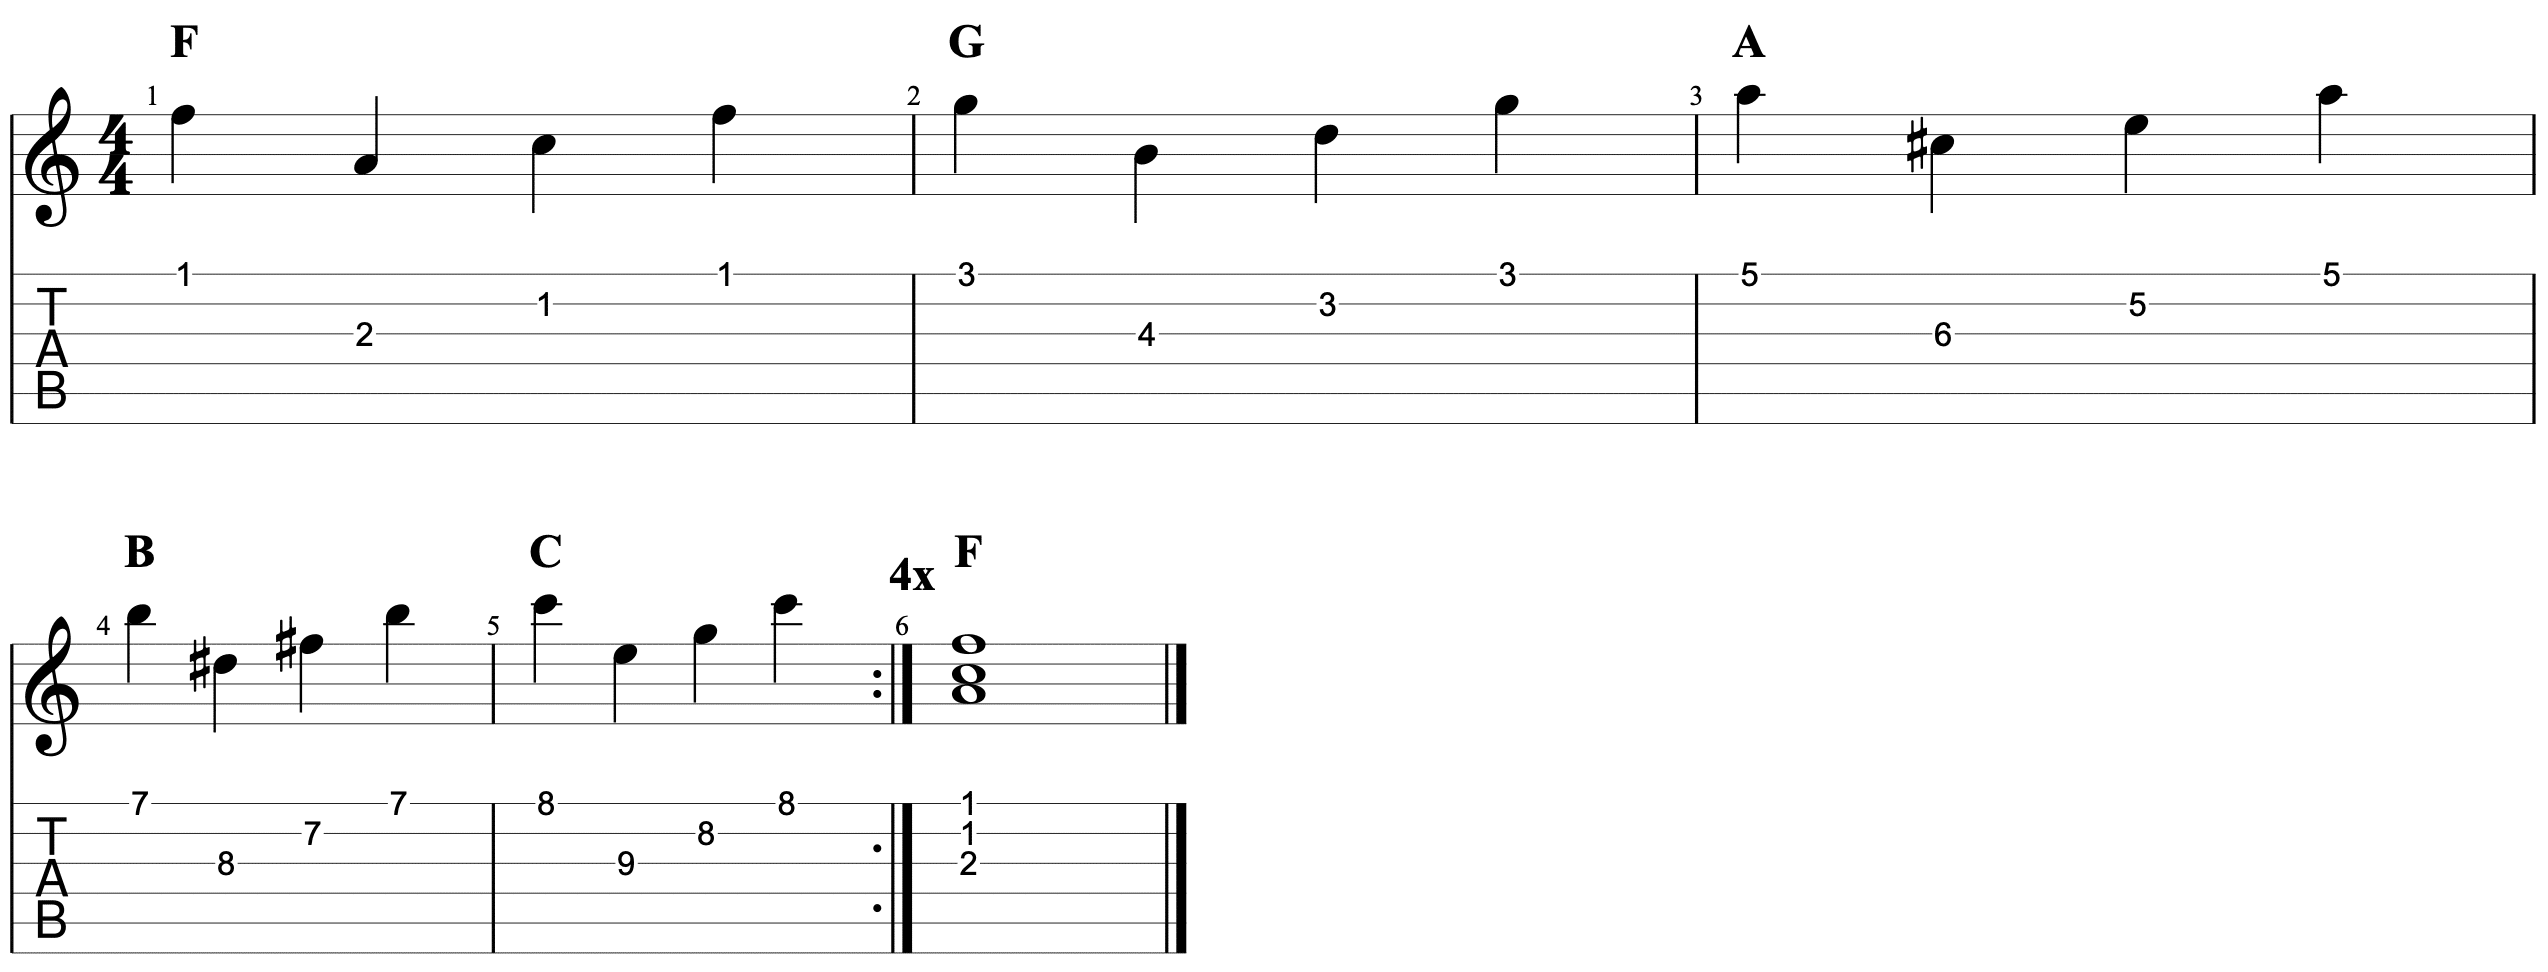
This exercise is similar to the previous one - but you'll notice that we "skip" some chords. Rather than play F then G, we skip up from F to A. We do something similar with G to C.
This exercise might prove a challenge. You'll need to move your bar chord a greater distance - over more frets. It is, however, very rewarding to be able to slide it up and down and get clear notes as you go.
With this guide, you can master bar chords in 1 month.
Become comfortable with the half-bar first and then move on to mastering the full-bar chords.
Work through the exercises and you'll be playing in no time.
p.s. if you want to start writing your own guitar tab, you can use a software called Guitar Pro which I talk about
here.
Get the Learn Fingerpicking Book
Register for the newsletter and I will send you this book (105 pages) and a free lesson once a month. This is the ideal resource for complete beginners who wish to learn guitar.