Evaluate your own technique, finger and wrist position to play guitar better and without pain
I regularly speak to people learning guitar who complain of arm, wrist and finger pain. Not only that, but when I ask people the reason they gave up on guitar, I often hear that playing was painful and they gave up as a result. It’s important to have perfect left hand guitar technique and I will show you how.
I will explain how to achieve perfect left hand guitar technique i.e. how to hold your guitar and how to fret notes to avoid pain and injury. By the end of this lesson, you will be able to evaluate your own technique, finger and wrist position to play guitar better and without pain.
I will break this down into 3 quick tips to ensure you won’t have any pain:
straighten the guitar on your lap
finger notes perpindicular to the neck
find the supporting position of the wrist
1. STRAIGHTEN THE GUITAR ON YOUR LAP
It’s vital that you keep the guitar straight on your lap.
We are sometimes tempted to look at what we are fingers are doing by angling the guitar back towards us.
See the photo below for what NOT to do.
Angling the guitar backwards – even a little bit – can cause wrist and arm pain.
Rather, it is important to keep that guitar upright – see the photo below for what “better” looks like..
If you look at the photo above, you will notice that
There is a natural contour to the guitar that his knee fits snugly into.
His right arm is keeping the top of the body of the guitar locked in place
This means that the guitar neck isn’t moving about all over the place. When fretting a chord, the left hand can place fingers down on a neck that isn’t moving. This is very important too.
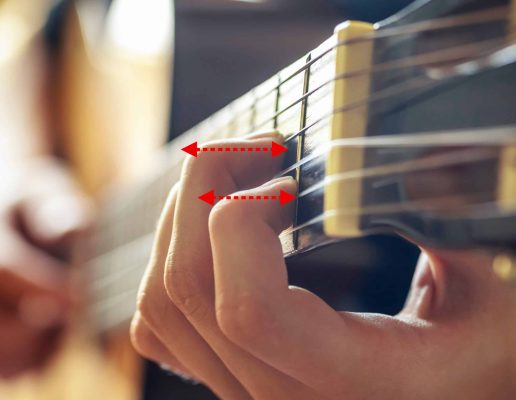
2. FINGER THE NOTES PERPENDICULAR TO THE NECK
It is important to fret the strings with each finger perpendicular to the fretboard
(at a right angle basically)
So GOOD looks like this the photo below.
Notice the red arrows and the how the fingers are perpendicular to the fretboard
I will now show you two examples of what BAD looks like.
Firstly here is someone whose third finger has gone too far up.
And here is an example of someone whose fingers haven’t gone up far enough!
The goal should be to make that fingering perpendicular as we have mentioned above.
3. FIND THE SUPPORTING POSITION OF THE WRIST
If you suffer from arm or wrist pain when playing guitar, there is a good chance that adjusting the wrist position can be the solution. So let’s make sure your wrist is doing the right thing.
If you first straighten the guitar (step 1) and then make sure your fingers are perpendicular (step 2), now the wrist almost naturally fixes itself.
Ask your hand the question “in order for those fingers to be straight, where should my wrist gently go to help those fingers do this job”.
It will be somewhere like here:
I have indicated in red that the part of the hand where the fingers join is right under the guitar neck (red arrow).
The wrist is back from here just a little bit.
So not quite underneath the guitar neck, but slightly back from there.
To repeat what I said above, the goal isn’t to put the wrist into a certain place.
Rather to allow it to find a place that helps the fingers achieve that perpendicular fingering on the fretboard.
Just getting started?
When you just start playing guitar, your fingers are naturally weak.
This is ok. The strength builds up over the course of a few weeks.
Playing with a new left hand guitar technique can take a little time.
I suggest playing for short (maybe 5 minute) periods if all this is new to you.
As always, if you notice any true pain, then stop. Take a break before trying to play again.
Our main goal in this article is to get those fingers straight at right angles – without forcing them or hurting them and finding our wrist position. This is fundamental to guitar playing so allow it to be something that takes a number of sessions to get the hang of.
Now it’s time to pick up the guitar and try these things. Really slow at first with just one or two chords.
Leave a comment below to tell me how this felt and what your arm and wrist are feeling…
summary
When you start playing guitar, your fingers are naturally weak. This is ok. The strength builds up over the course of a few weeks.
Playing with a new left hand guitar technique can take a little time. I suggest playing for short (maybe 5 minute) periods if all this is new to you. As always, if you notice any true pain, then stop. Take a break before trying to play again.
Our main goal in this article is to get those fingers straight at right angles – without forcing them or hurting them and finding our wrist position. This is fundamental to guitar playing so allow it to be something that takes a number of sessions to get the hang of.
Now it’s time to pick up the guitar and try these things. Really slow at first with just one or two chords.


 |")