FINGERPICKING PATTERNS
10 Intermediate Fingerpicking Patterns
Fingerpicking exercises to improve your playing – 10 fun fingerpicking patternss
How to MASTER THESE FINGERPICKING PATTERNS
I recommend going through each one slowly at first until you can play it at a slow speed. Make sure you are using the appropriate fingers of the left (picking) hand in each exercise. You can gradually build speed once you have mastered the exercise at slow tempo.
I suggest listening to all the audio files first – just to get a little inspiration. If you want to jump back and forth between them, that’s ok. For each given exercise, play along to the slower audio file (96 bpm) before trying to play along to the faster audio file (120 bpm)
Fingerpicking Pattern 1
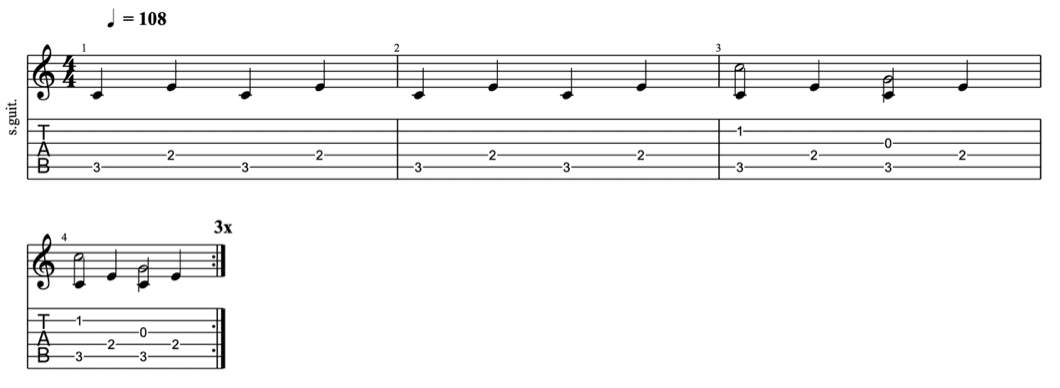
Fret a C chord. The first 2 bars is just the bass using the thumb.
- This pattern has a 5-4 bassline
- Thus, your thumb will alternate between the 5th string (A) and 4th string (D).
- Add melody notes on the first and third beats of the bar in bar 3 and 4
- Effectively, you always play a melody note with the C bass note in bars 3 and 4
Fingerpicking Pattern 1 – Slow Audio
Fingerpicking Pattern 1 – Fast Audio
Fingerpicking Pattern 2
Fret a C chord. The first 2 bars is just the bass using the thumb.
- This pattern has a 5-4-6-4 bassline
- Thus, your thumb will play the 5th string (A) and 4th string (D) then 6th string (E) then 4th string again (D).
- The first melody note is on the beat – which is beat 1
- The second melody note is off the beat – between beat 3 and 4

Fingerpicking Pattern 2 – Slow Audio
Fingerpicking Pattern 2 – Fast Audio
Fingerpicking Pattern 3
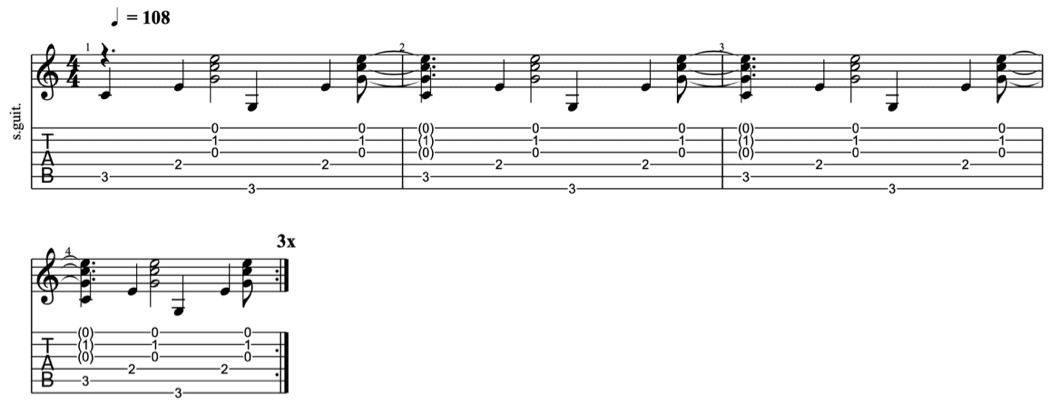
Fret a C chord.
- This pattern has a 5-4-6-4 bassline
- Add chord flicks in-between bass notes 2&3 and after bass note 4
- Use the index finger to strum downwards to achieve this “chord flick”
- The notes in brackets are “tied notes” – which extend the duration of the chord flick notes over the bar.
- So don’t play the notes in brackets. We only need to play the first notes when two notes are tied together. Think of these as just the chord ringing
Fingerpicking Pattern 3 – Slow Audio
Fingerpicking Pattern 3 – Fast Audio
Fingerpicking Pattern 4
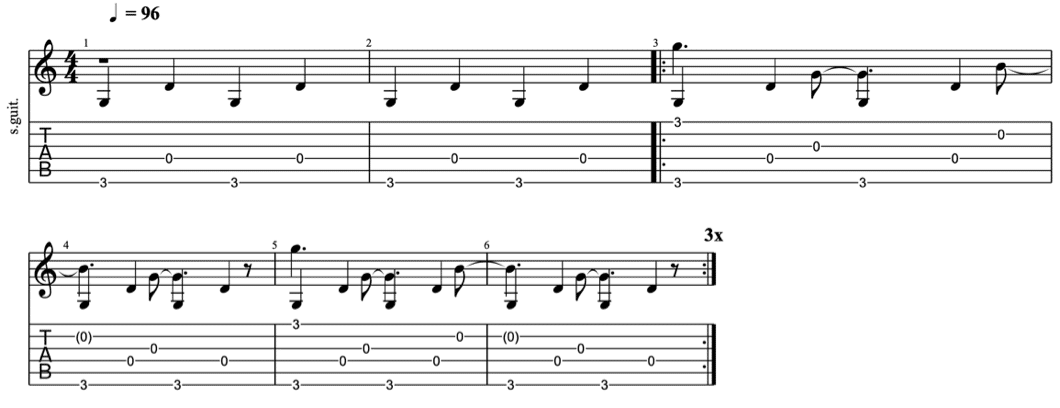
Fret a G chord. The first 2 bars is just the bass using the thumb.
- This pattern has a 6-4 bassline
- Thus, your thumb will alternate between the 6th string (E string) and 4th string (D string).
- In bar 3 & 4, add two melody notes, both are off the beat (in-between bass notes)
Fingerpicking Pattern 4 – Slow Audio
Fingerpicking Pattern 4 – Fast Audio
Fingerpicking Pattern 5
Fret a G chord. The first 2 bars is just the bass using the thumb.
- This pattern has a 6-4 bassline (as above)
- In bar 3 & 4, add two melody notes, both are off the beat (as the example above)
- Add a couple of chord flicks in bar 5 & 6
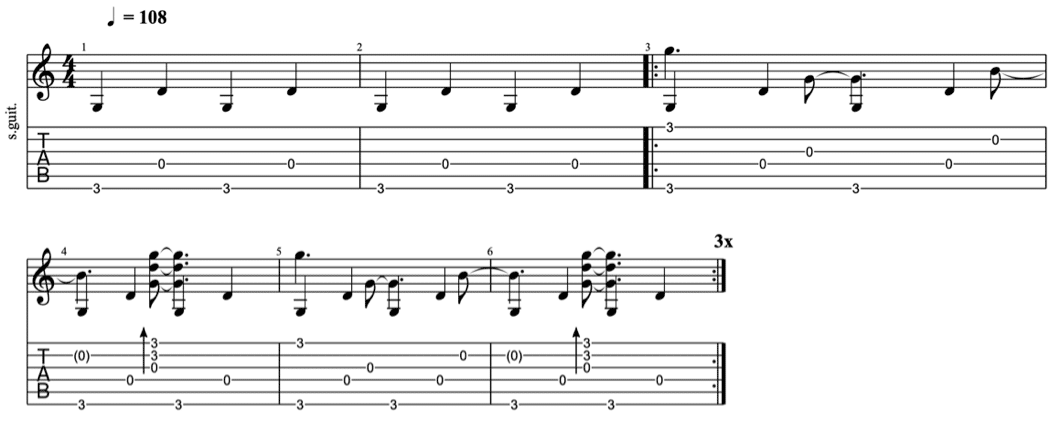
Fingerpicking Pattern 5- Slow Audio
Fingerpicking Pattern 5 – Fast Audio
Fingerpicking Pattern 6
Fret a C chord. The first 2 bars is just the bass using the thumb.
- This pattern has a 5-4 bassline
- Thus, your thumb will alternate between the 5th string (A) and 4th string (D).
- Add a few chord flicks per bar – this will help that flicking motion become truly fluid and automatic
- This fingerpicking pattern is trickier than it looks – take your time with it.
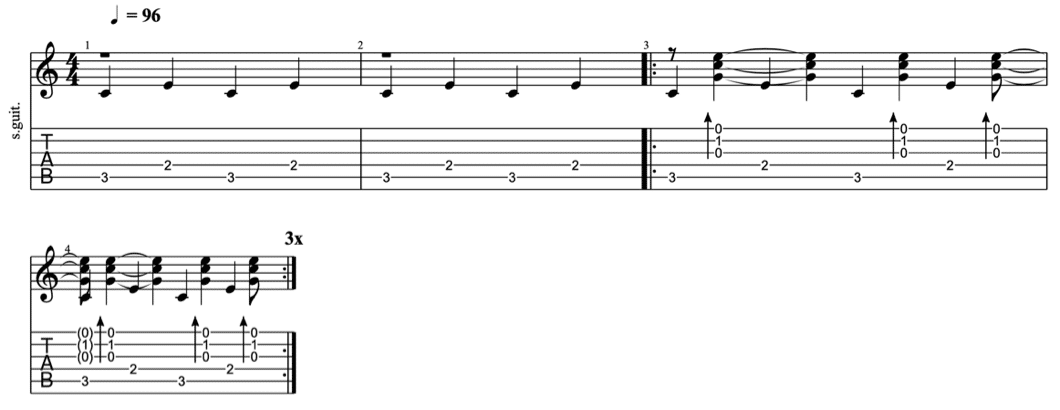
Fingerpicking Pattern 6 – Slow Audio
Fingerpicking Pattern 6 – Fast Audio
Fingerpicking Pattern 7
Fret a C chord. The first 2 bars is just the bass using the thumb.
- This pattern has a 5-4 bassline
- Add a few chord flicks per bar
- Note the arrows in the tab – the first chord flick has a down arrow so we use the downward motion of right-hand index finger to achieve this.
- The next chord flick has an up arrow – so we use an upward flick of the same index finger to achieve this
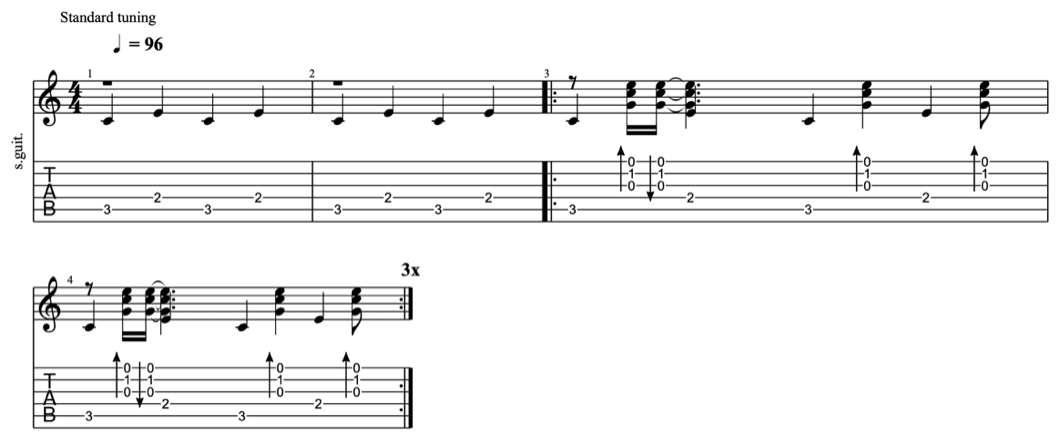
Fingerpicking Pattern 7 – Slow Audio
Fingerpicking Pattern 7- Fast Audio
Fingerpicking Pattern 8
Fret a G chord. This fingerpicking pattern focuses on the bass so you are using your thumb only.
The first 2 bars is just the bass using the thumb.
- The chords change from G to C to D to G (which repeats)
- The bassline is different the second time around we get to D
- Focus on getting this right at slow tempo. There’s lots of thumb movement here which we want to make “automatic”
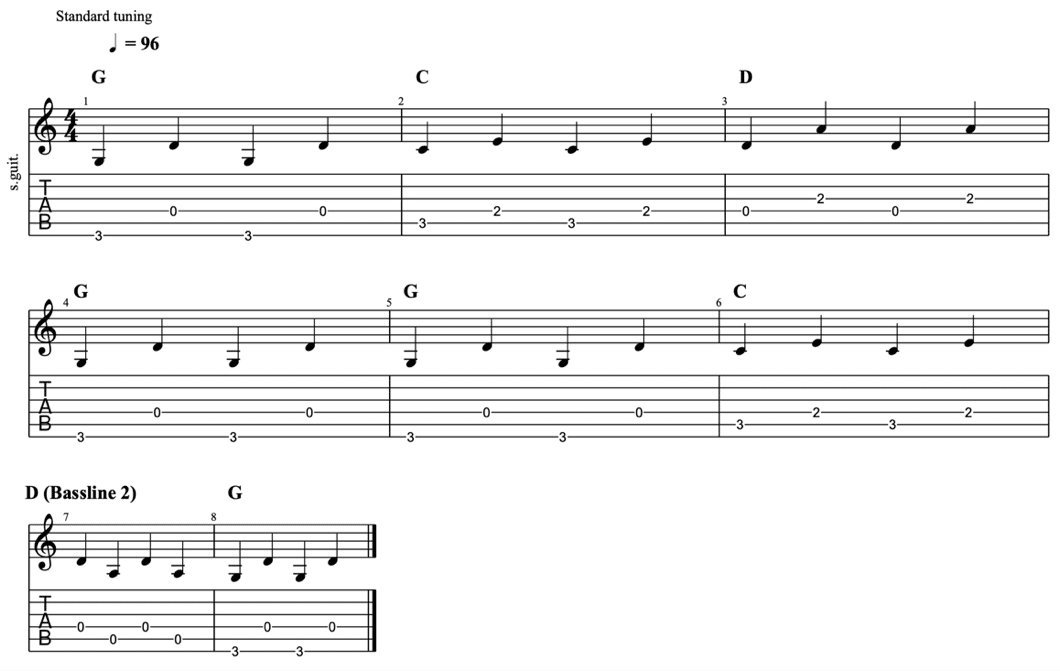
Fingerpicking Pattern 8 – Slow Audio
Fingerpicking Pattern 8 – Fast Audio
Fingerpicking Pattern 9
The same chord changes as fingerpicking pattern 8. Now we’ll add chord flicks.
- Note that some of the chord flicks are at the same time as a bass note.
- When this happens, you don’t need to play the bass note with your thumb.
- Rather, let the chord flick/strum ring out the bass note
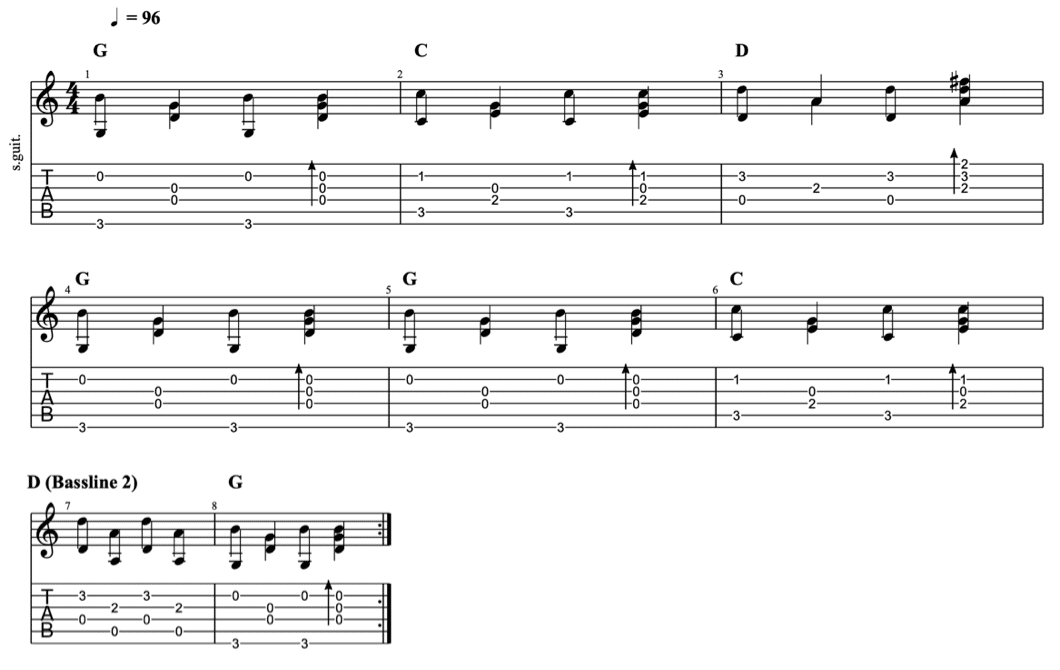
Fingerpicking Pattern 9 – Slow Audio
Fingerpicking Pattern 9 – Fast Audio
Fingerpicking Pattern 9 – Fast Audio
Fingerpicking Pattern 10
Building on the last exercise, we now add some up/down chord flicks
- This is quite the complex piece to start slow
- Take your time and try to play without watching the neck (once you feel like you’re starting to master it).
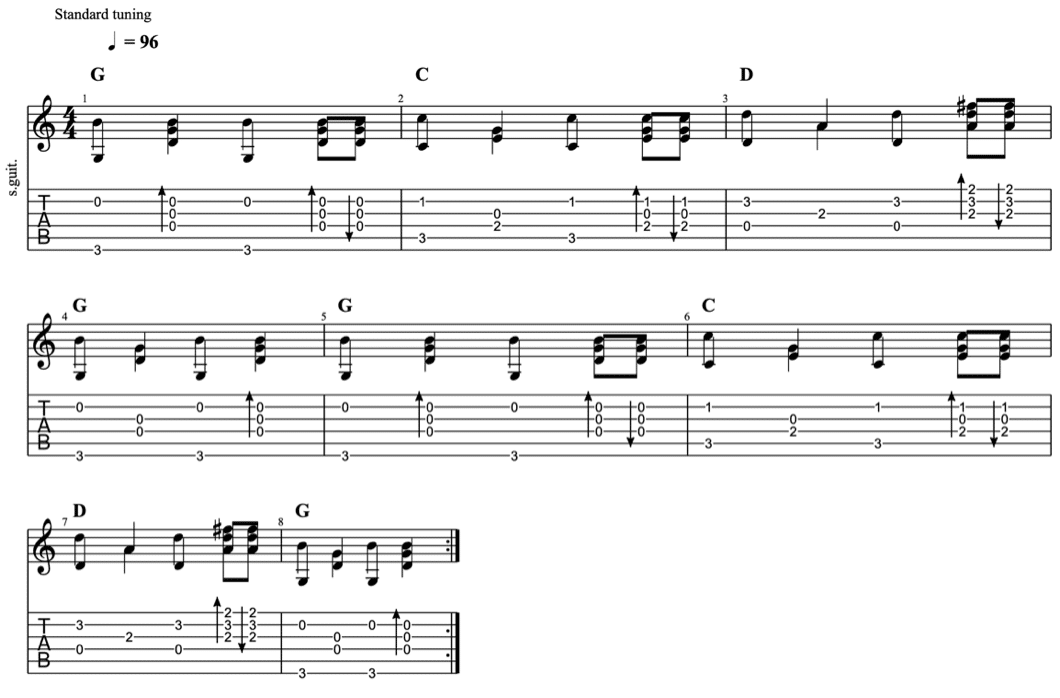
Fingerpicking Pattern 10 – Slow Audio
Fingerpicking Pattern 10 – Fast Audio
Summary
Play each exercise nice and slowly. The trick to adding new fingerpicking patterns to your repertoire is to play each one long enough that it just becomes habit – i.e. you can play it without thinking. With that goal in mind, be patient and trust me, the automation of these fingerstyle patterns will happen before you know it.
If you want to learn fingerstyle on guitar, this is the most productive way to go.
If you want to be get hold of 50 of these examples – with tab and audio that you can download – there is a link below to get the full set of 50 Intermediate exercises.
Please share this article with your followers using the buttons below
INTERMEDIATE LEVEL