BEGINNER LESSON
Fingerpicking exercises - which fingers play which strings?
In this video, we learn the “Big Rule” of which fingers to use – how to use the index, middle and index fingers of the left hand to play their own assigned guitar string & fingerpicking exercises to master it
LESSON CONTENT
The Big Rule
In order to play fingerpicking guitar, the real key to begin with is the right hand. Some fingerpicking exercises will build good technique in no time!
Start by fretting a G chord with your left hand. Holding this G chord in place is all we are going to do for the rest of the lesson (with the left hand).
What is the big rule?
When you play guitar, you use two hands obviously and the right hand frets chords or individual notes and the left hand hits the strings. When you play a chord, you hit all the strings at once. But when you want to do fingerpicking, then each finger will hit individual strings.
In playing guitar with the fingers, there is one big rule:
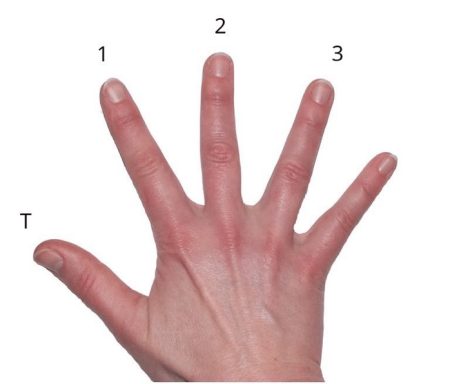
The thumb plays the bottom three strings (the bass strings which are the 6th, the 5th and the 4th) and it has ownership for any notes played on those three strings (the one nearest your head) and the other three fingers play one string each!
If there is a note on the 6th, 5th or 4th string, the thumb must play it.
The index finger always plays the G string or third string.
The middle finger always plays the B string or second string.
The ring finger always plays the high E string or first string.
And that’s it!

It sounds simple. It is simple! But at first, it will take a little bit of practice for those fingers to obey you. In particular, in a rush to play what the brain is telling it, some students end up playing it with one finger – because it is easier. Well, if you notice that, just make yourself practice using the right fingers per string again. And here’s a great exercise if you notice that happening
Fingerpicking Exercise 1 - One Finger Per String - Open Strings
What we will do now is play a G chord.
The bass note is on the sixth string (low E string). Let’s play that four times with the thumb (T)
The G string is played by the index finger – let’s play that four times
The B string is played by the middle finger – let’s play that four times.
The high E string is played by the ring finger – let’s play that four times.

It’s actually really nice to play each of these notes four times. Because when you do so, it gives your mind some time to play and also to think about ‘am I using the right finger there?’.
So as a beginner, feel free to play this exercise a few times. If you think it’s really super easy, then try to speed it up. But the most important thing is using the right finger, not speed.
Fingerpicking Exercise 2 - One Finger Per String - G chord
PRACTICE EXERCISE
Now we fret the G chord with the left hand.
And we are going to leave it there for the rest of this lesson so once you have it fretted, your left hand has nothing more to do.
And then we do the same thing as before with the picking hand.
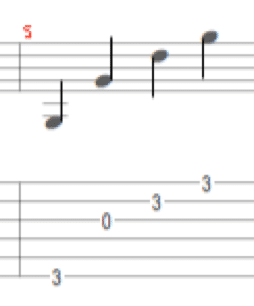
First play the thick string (6th) four times, then the third, second and first strings – each four times.
It looks like this:

Fingerpicking Exercises 3 - The T123 pattern
Now play each of those strings but just once each. If you look at the fingers of the right hand (the picking hand) and you describe the order in which they play notes, you might describe it as “thumb, index finger, middle finger, ring finger”.
You could also describe it as “thumb, first finger, second finger, third finger” of the right hand and as a shorthand, we will refer to that as “thumb 1-2-3” or T123.
Note that this refers to which right hand finger you use. As the thumb covers three strings according to the Big Rule, you might also add which string the thumb is going to play. So you could describe the pattern above as T123 where the thumb plays the 6th string. It is important to note that if I say T123 that I mean thumb, first finger, second finger and third finger – not thumb, first string, second string, third string.
If you think about this for just a second then it will make sense, and you will be clear for the rest of the course. We know from the Big Rule which string the first finger (index finger) will play for example. It’s always the third string. Because of this, it is possible to not talk about which strings and just which fingers. As I said above, you might just make a note of which of three strings the thumb will play (and I will always tell you).
But once you know the finger pattern (and which note for the thumb), then you by default know which strings to play. This might be confusing at first, but don’t spend too long puzzling over it. It will become obvious as we go if it isn’t right now. What is our focus playing this first exercise? The focus is not on speed; instead we focus on using the right fingers of the left hand and having a nice clean note! That’s the most important thing.

PRACTICE FINGERPICKING EXERCISE
So your assignment after our first lesson is to play this pattern (exercise 2) for a few minutes until you are comfortable with it. Feel free to stick with just the G chord. But try something new also with the right hand. Experiment! Do something different! Maybe it is to play the notes backwards (from highest E to the low E). Or maybe you play each note twice? Maybe you skip a note? I cannot emphasise enough how great it is for you musically to just experiment and mess around with everything I show you.
As a bonus, if you know some other chords, try this pattern – you might notice it sounds great with other chords and sometimes not. Any idea why that is? We’ll explain it in lesson 2, but it’s worth thinking about now.
Get the Learn Fingerpicking Book
Register for the newsletter and I will send you this book (105 pages) and a free lesson once a month.
This is the ideal resource for complete beginners who wish to learn guitar.
